Introduction
A reverse proxy sits between clients and your backend servers, forwarding client requests while providing additional features like SSL termination, load balancing, and caching. Nginx has established itself as the industry standard for this purpose due to its performance, flexibility, and mature ecosystem. This guide demonstrates how to configure Nginx for various use cases, from simple static file serving to complex microservice architectures.
Understanding reverse proxy concepts prepares you for infrastructure designs that scale and remain maintainable. We will implement configurations that you can adapt to your specific requirements, whether hosting multiple applications on a single server or distributing traffic across a cluster of backend services.
The examples in this guide assume you have a basic Nginx installation and understand HTTP fundamentals. Each configuration builds on previous sections, allowing you to progressively master reverse proxy concepts while seeing how they fit together in production environments.
Understanding Reverse Proxies
Before diving into configuration, grasping the conceptual foundation helps you make better implementation decisions. A reverse proxy differs from a forward proxy in its position and purpose relative to your infrastructure.
How Reverse Proxies Work
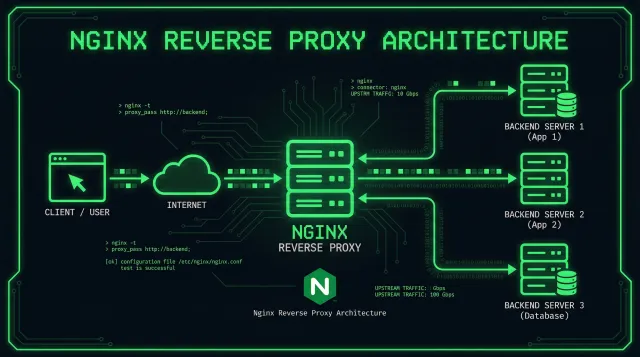
When a client requests a resource from your website, the request first reaches your reverse proxy server. The proxy evaluates the request based on configured rules, determines which backend server should handle it, and forwards the request. The backend server processes the request and returns a response, which the proxy then sends back to the original client. This process happens transparently, and the client typically never knows their request passed through a proxy.
This architecture provides several advantages. You can run multiple backend applications on different ports while presenting a unified port 443 to the outside world. SSL certificates need only exist on the proxy server, simplifying certificate management. Load distribution across multiple backend servers improves reliability and performance. Caching at the proxy layer reduces load on backend servers and decreases response times for repeat requests.
Common Use Cases
Organizations deploy reverse proxies for various reasons. Some run multiple websites on a single server by routing traffic based on domain name. Others use them to expose APIs that backend servers do not directly expose to the internet. High-traffic sites implement reverse proxies to distribute load across multiple application servers, improving both performance and fault tolerance.
Development teams use reverse proxies to route requests to different backends based on URL paths, enabling gradual migrations between old and new systems. Security teams leverage proxy features to implement web application firewalls and rate limiting. Operations teams benefit from centralized logging and request metrics that proxy servers naturally provide.
Basic Reverse Proxy Configuration
This section covers the fundamental configuration patterns that apply to most reverse proxy scenarios. Master these basics before exploring advanced features in later sections.
Simple Forward Configuration
The most basic reverse proxy configuration forwards all requests to a single backend server. This pattern suits applications running entirely on backend servers without complex routing requirements.
Create a configuration file for your site:
server {
    listen 80;
    server_name example.com www.example.com;

    location / {
        proxy_pass http://localhost:8080;
        proxy_set_header Host $host;
        proxy_set_header X-Real-IP $remote_addr;
        proxy_set_header X-Forwarded-For $proxy_add_x_forwarded_for;
        proxy_set_header X-Forwarded-Proto $scheme;
    }
}
The proxy_pass directive specifies where Nginx should forward requests. The proxy_set_header directives ensure backend servers receive accurate client information. Without these headers, your backend sees all requests originating from the proxy server itself, losing valuable client context.
Test and apply the configuration:
# Test configuration syntax
sudo nginx -t

# Reload Nginx to apply changes
sudo systemctl reload nginx
The headers defined here serve specific purposes. Host preserves the original domain name for virtual hosting on the backend. X-Real-IP provides the client’s actual IP address for logging and access control. X-Forwarded-For maintains a chain of IP addresses through multiple proxies. X-Forwarded-Proto tells the backend whether the original request used HTTP or HTTPS.
Multiple Backend Servers
As traffic grows, distributing requests across multiple backend servers improves reliability and performance. Nginx’s upstream module defines pools of backend servers and handles load distribution.
upstream backend_servers {
    server 10.0.0.2:8080 weight=3;
    server 10.0.0.3:8080 weight=2;
    server 10.0.0.4:8080 weight=1;
}

server {
    listen 80;
    server_name example.com;

    location / {
        proxy_pass http://backend_servers;
        proxy_set_header Host $host;
        proxy_set_header X-Real-IP $remote_addr;
        proxy_set_header X-Forwarded-For $proxy_add_x_forwarded_for;
        proxy_set_header X-Forwarded-Proto $scheme;
    }
}
The upstream block defines backend servers and their weights. Higher weights direct more traffic to those servers. This configuration suits scenarios where backend servers have different capacity levels or you want to gradually shift traffic during deployments.
SSL Termination and Security
Implementing HTTPS for your reverse proxy protects data in transit and improves search engine rankings. This section covers SSL configuration and security headers that protect both your infrastructure and your users.
SSL Certificate Configuration
Obtain SSL certificates from a trusted Certificate Authority. Let’s Encrypt provides free certificates, making HTTPS accessible to everyone. Certbot automates certificate acquisition and renewal.
# Install Certbot
sudo apt install certbot python3-certbot-nginx -y

# Obtain and configure certificate
sudo certbot --nginx -d example.com -d www.example.com
Certbot modifies your Nginx configuration to include SSL settings and redirects HTTP traffic to HTTPS. The resulting configuration includes recommended security settings:
server {
    listen 80;
    server_name example.com www.example.com;
    return 301 https://$host$request_uri;
}

server {
    listen 443 ssl;
    server_name example.com www.example.com;

    ssl_certificate /etc/letsencrypt/live/example.com/fullchain.pem;
    ssl_certificate_key /etc/letsencrypt/live/example.com/privkey.pem;

    # SSL configuration
    ssl_session_timeout 1d;
    ssl_session_cache shared:SSL:50m;
    ssl_session_tickets off;

    # Modern TLS configuration
    ssl_protocols TLSv1.2 TLSv1.3;
    ssl_ciphers ECDHE-ECDSA-AES128-GCM-SHA256:ECDHE-RSA-AES128-GCM-SHA256:ECDHE-ECDSA-AES256-GCM-SHA384:ECDHE-RSA-AES256-GCM-SHA384;
    ssl_prefer_server_ciphers off;

    # HSTS header
    add_header Strict-Transport-Security "max-age=63072000" always;

    location / {
        proxy_pass http://localhost:8080;
        proxy_set_header Host $host;
        proxy_set_header X-Real-IP $remote_addr;
        proxy_set_header X-Forwarded-For $proxy_add_x_forwarded_for;
        proxy_set_header X-Forwarded-Proto $scheme;
    }
}
The SSL configuration follows current best practices. HSTS (HTTP Strict Transport Security) instructs browsers to always use HTTPS for your domain. Modern protocol versions and cipher suites prevent attacks against deprecated security features.
Security Headers
Additional HTTP headers protect against common web vulnerabilities. Configure these headers in your server or location blocks:
# Protect against clickjacking
add_header X-Frame-Options "SAMEORIGIN" always;

# Prevent MIME type sniffing
add_header X-Content-Type-Options "nosniff" always;

# XSS protection (legacy browsers)
add_header X-XSS-Protection "1; mode=block" always;

# Referrer policy
add_header Referrer-Policy "strict-origin-when-cross-origin" always;

# Content Security Policy
add_header Content-Security-Policy "default-src 'self' http: https: data: blob: 'unsafe-inline'" always;

# Permissions policy
add_header Permissions-Policy "geolocation=(), microphone=(), camera=()" always;
Review your Content Security Policy carefully. The example provides a starting point, but your application may require additional domain allowances. Test thoroughly after implementation, as overly restrictive policies can break functionality.
Advanced Routing Patterns
Production environments often require complex routing logic that goes beyond simple URL forwarding. This section covers patterns for path-based routing, domain-based routing, and A/B testing implementations.
Path-Based Routing
Route requests to different backend services based on URL paths. This pattern enables microservice architectures where distinct functionality runs on separate servers.
# API requests go to backend API servers
location /api/ {
    proxy_pass http://localhost:3000;
    proxy_http_version 1.1;
    proxy_set_header Upgrade $http_upgrade;
    proxy_set_header Connection 'upgrade';
    proxy_set_header Host $host;
    proxy_set_header X-Real-IP $remote_addr;
    proxy_set_header X-Forwarded-For $proxy_add_x_forwarded_for;
    proxy_cache_bypass $http_upgrade;
}

# Static assets served from dedicated server
location /static/ {
    proxy_pass http://localhost:4000;
    expires 30d;
    add_header Cache-Control "public, immutable";
}

# Admin interface on separate backend
location /admin/ {
    allow 10.0.0.0/8;
    deny all;
    proxy_pass http://localhost:5000;
    proxy_set_header Host $host;
    proxy_set_header X-Real-IP $remote_addr;
}

# Everything else goes to the main application
location / {
    proxy_pass http://localhost:8080;
    proxy_set_header Host $host;
    proxy_set_header X-Real-IP $remote_addr;
    proxy_set_header X-Forwarded-For $proxy_add_x_forwarded_for;
}
The API location block includes WebSocket support headers (Upgrade and Connection), enabling real-time communication. Static assets receive caching headers for improved browser performance. The admin section includes IP-based access control, restricting administrative interfaces to internal networks.
Domain-Based Routing
Serve different domains from the same Nginx instance, routing each to appropriate backend servers. This configuration handles multi-tenant applications or separate products within an organization.
# Main application
server {
    listen 80;
    server_name app.example.com;

    location / {
        proxy_pass http://localhost:8080;
        # ... proxy headers
    }
}

# Documentation site
server {
    listen 80;
    server_name docs.example.com;

    root /var/www/docs;
    index index.html;

    location / {
        try_files $uri $uri/ =404;
    }
}

# Admin dashboard
server {
    listen 80;
    server_name admin.example.com;

    location / {
        proxy_pass http://localhost:9000;
        # ... proxy headers
    }
}
Each server block listens for requests to its designated domain. Nginx examines the Host header to determine which block handles each request. This approach consolidates multiple services behind a single entry point while maintaining logical separation.
Load Balancing Strategies
Beyond simple round-robin distribution, Nginx supports several load balancing algorithms suited to different traffic patterns and backend server characteristics.
Configuration Options
upstream myapp {
    # Round robin (default)
    server 10.0.0.2:8080;
    server 10.0.0.3:8080;
    server 10.0.0.4:8080;

    # Least connections - sends requests to server with fewest active connections
    least_conn;

    # IP hash - ensures same client reaches same server
    ip_hash;

    # Generic hash - hash based on arbitrary variable
    hash $request_uri consistent;
}
Choose your load balancing method based on your backend characteristics. Least connections works well when request processing times vary significantly. IP hash maintains session persistence when your application does not support external session stores. Hash-based distribution suits caching scenarios where consistent backend assignment improves cache hit rates.
Health Checks
Nginx Plus includes active health checks, but open-source Nginx achieves similar results through the max_fails and fail_timeout parameters:
upstream backend {
    server 10.0.0.2:8080 max_fails=3 fail_timeout=30s;
    server 10.0.0.3:8080 max_fails=3 fail_timeout=30s;
    server 10.0.0.4:8080 max_fails=3 fail_timeout=30s;
}
If a server fails to respond fail_timeout times within the specified period, Nginx marks it as unavailable for the duration. This automatic detection ensures requests route to healthy servers while failed servers recover.
Conclusion
Nginx reverse proxy configurations range from simple single-server forwarding to complex multi-domain architectures with advanced routing and load balancing. The patterns in this guide provide foundations that adapt to your specific requirements.
Continue exploring Nginx capabilities as your infrastructure grows. Consider implementing caching layers for static content, rate limiting for API protection, and logging configurations that aid troubleshooting. Each feature you master improves your ability to build robust, performant infrastructure.
Related Posts: