Introduction
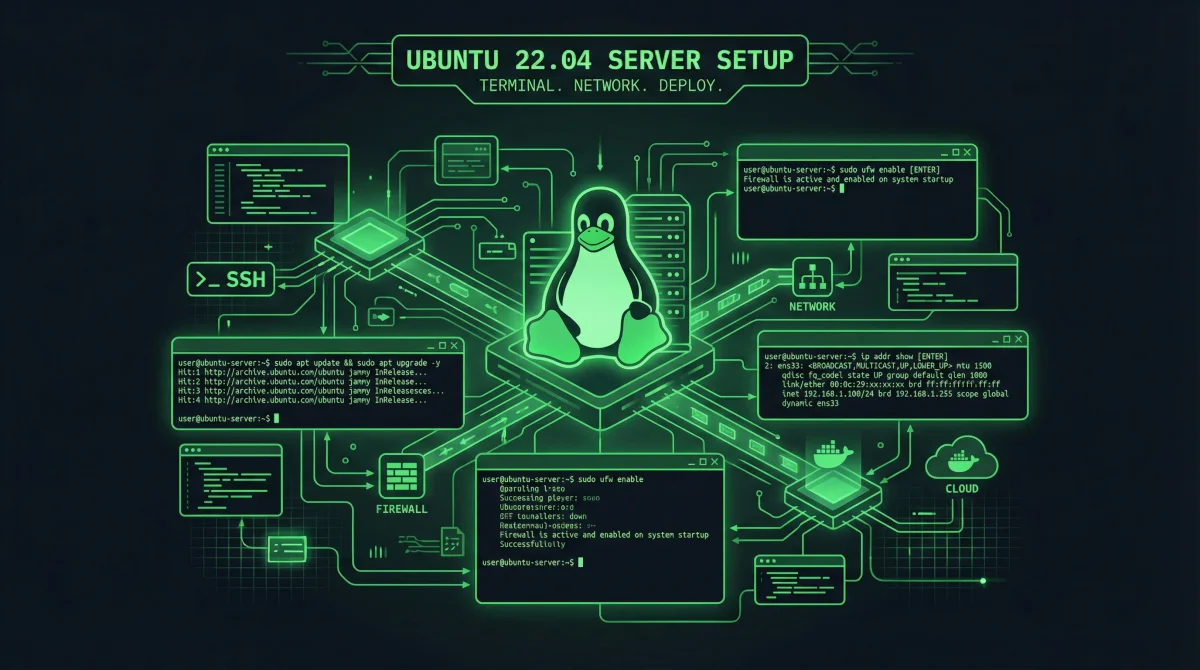
Setting up a Linux server requires careful attention to configuration, security, and performance optimization. Ubuntu 22.04 LTS (Long Term Support) remains one of the most popular choices for production servers, offering a balance of stability, security, and modern features. This guide walks you through the complete process of transforming a fresh Ubuntu installation into a secure, production-ready server.
The steps in this guide follow best practices accumulated from years of production deployments. Each configuration decision considers security implications, performance impact, and maintainability. Whether you are setting up a web server, database server, or development environment, the principles here apply broadly.
We will cover everything from initial server access through SSH to hardening your server against common threats. The guide assumes you have root or sudo access to a fresh Ubuntu 22.04 installation and a basic command line knowledge. By the end, you will have a server ready for production use.
Initial Server Configuration
Before installing any services, you need to establish secure access to your server and perform basic hardening. These initial steps create the foundation for all subsequent configurations and significantly impact your server’s security posture.
Connecting via SSH
Secure Shell (SSH) provides encrypted remote access to your server. After obtaining your server’s IP address from your hosting provider, establish your first connection. The default SSH port is 22, and the initial login uses either the root user or a user created during installation.
# Connect to your server (replace with your IP address)
ssh root@your_server_ip

# If you created a non-root user during installation
ssh username@your_server_ip
Upon first connection, SSH presents the server’s fingerprint for verification. Type “yes” to accept and continue. This fingerprint gets stored in your ~/.ssh/known_hosts file for future connections. If you see a warning about a changed fingerprint, investigate before connecting, as this could indicate a man-in-the-middle attack.
For enhanced security, disable password authentication and force key-based login. We will configure this later in the security section. For now, ensure you can connect successfully and keep your terminal session open.
Creating a Non-Root User
Operating your server exclusively as root increases risk because root has unrestricted access to all commands and files. A misconfigured command could damage your system, and any attacker gaining root access has complete control. Create a dedicated user account for daily administration tasks.
# Create a new user (replace 'admin' with your preferred username)
adduser admin

# Add the user to the sudo group for administrative tasks
usermod -aG sudo admin

# Verify the user's groups
groups admin
The adduser command prompts for a password and optional additional information. Choose a strong password following standard security practices. The user now has sudo privileges, meaning you can prefix commands with sudo to perform administrative tasks.
Switch to your new user account to verify everything works correctly:
# Switch to the new user
su - admin

# Verify sudo access by running a privileged command
sudo whoami
The output should display “root,” confirming your sudo configuration works correctly. Keep this session open and open a new terminal for the remaining configurations.
Security Hardening
Security should never be an afterthought. Implementing these measures immediately after initial setup protects your server from common attack vectors while maintaining usability for legitimate administrators.
Configuring the Firewall
Ubuntu includes UFW (Uncomplicated Firewall) by default, providing a straightforward interface for managing iptables rules. Configure UFW to allow only necessary traffic, blocking everything else by default.
# Check UFW status
sudo ufw status

# Allow SSH connections (cruital before enabling firewall)
sudo ufw allow OpenSSH

# Allow HTTP and HTTPS for web servers
sudo ufw allow http
sudo ufw allow https

# Enable the firewall
sudo ufw enable

# Verify the configuration
sudo ufw status verbose
The order of operations matters here. Allowing SSH before enabling UFW prevents you from locking yourself out of your server. If you are connecting from a specific IP address, you can further restrict SSH access:
# Allow SSH only from your IP address
sudo ufw allow proto tcp from your_ip_address to any port 22
SSH Hardening
The default SSH configuration includes several insecure options that should be changed for production environments. Edit the SSH daemon configuration file to implement these hardening measures.
# Edit the SSH configuration
sudo nano /etc/ssh/sshd_config
Make the following changes to improve security:
# Disable root login
PermitRootLogin no

# Disable password authentication (force key-based auth)
PasswordAuthentication no

# Change the default SSH port (security through obscurity, limited value)
Port 2222

# Limit connection attempts
MaxAuthTries 3

# Set connection timeout
ClientAliveInterval 300
ClientAliveCountMax 2

# Disable X11 forwarding (unnecessary for servers)
X11Forwarding no

# Allow only specific users
AllowUsers admin username
After saving changes, restart the SSH service:
# Test your configuration before restarting
sudo sshd -t

# Restart SSH if no errors
sudo systemctl restart ssh
Keep your current terminal session open while testing the new configuration. Open a new terminal and attempt to connect using your new settings. Only close your original session after confirming the new configuration works.
Installing Fail2Ban
Fail2Ban monitors log files and temporarily bans IP addresses showing malicious signs such as too many failed login attempts. This automated protection significantly reduces brute-force attack success rates.
# Install Fail2Ban
sudo apt update
sudo apt install fail2ban -y

# Create a local configuration file
sudo cp /etc/fail2ban/jail.conf /etc/fail2ban/jail.local

# Edit the configuration
sudo nano /etc/fail2ban/jail.local
The default configuration provides good protection for SSH. Customize the [sshd] section to match your SSH port if you changed it from the default:
[sshd]
enabled = true
port = 2222
filter = sshd
logpath = /var/log/auth.log
maxretry = 3
bantime = 3600

# Start and enable Fail2Ban
sudo systemctl start fail2ban
sudo systemctl enable fail2ban

# Check Fail2Ban status
sudo fail2ban-client status
System Configuration
With security foundations in place, configure essential system settings that affect performance and reliability. These optimizations ensure your server runs efficiently under various workloads.
Configuring Time Synchronization
Accurate time synchronization is critical for log analysis, certificate validation, and scheduled tasks. Ubuntu uses systemd-timesyncd by default, which provides reliable NTP synchronization.
# Check current time synchronization status
timedatectl status

# View NTP servers in use
systemd-analyze blame | grep -i time

# If timesyncd is not active, enable it
sudo timedatectl set-ntp on

# Verify synchronization status
timedatectl timesync-status
The output shows whether your system is synchronized and which NTP servers are in use. For servers in isolated networks, you may need to configure internal NTP servers. Edit /etc/systemd/timesyncd.conf to specify custom servers.
Optimizing Swap Configuration
Swap space provides a safety net when physical memory becomes exhausted. While SSD-based servers benefit from swap, improper configuration can reduce performance. Configure swap to activate only when memory pressure is high.
# Check current swap configuration
sudo swapon --show

# View current swappiness setting
cat /proc/sys/vm/swappiness

# Set swappiness to 10 (aggressive swapping only under pressure)
sudo sysctl vm.swappiness=10

# Make the change permanent
echo 'vm.swappiness=10' | sudo tee -a /etc/sysctl.conf

# Configure swapiness for applications
echo 'vm.vfs_cache_pressure=50' | sudo tee -a /etc/sysctl.conf
If your server has less than 2GB of RAM, consider creating a swap file. Modern Ubuntu installations typically handle this automatically, but verifying the configuration ensures optimal behavior.
Configuring Hostname and Hosts File
A proper hostname configuration improves system identification and network resolution. Configure your server’s hostname to reflect its purpose or location.
# View current hostname
hostnamectl

# Set a descriptive hostname
sudo hostnamectl set-hostname server01

# Edit the hosts file for proper resolution
sudo nano /etc/hosts
Add or modify the hosts file entry to ensure proper hostname resolution:
127.0.0.1 localhost
your_server_ip server01.yourdomain.com server01
Service Installation and Configuration
With the base system configured, you can now install and configure the services your server needs. This section covers common server types, though your specific requirements may differ.
Installing Nginx
Nginx serves as a high-performance web server and reverse proxy. Its event-driven architecture handles thousands of concurrent connections efficiently, making it suitable for high-traffic websites and API backends.
# Install Nginx
sudo apt install nginx -y
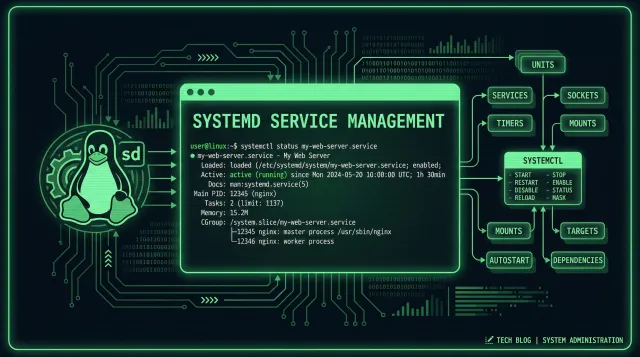
# Start and enable Nginx
sudo systemctl start nginx
sudo systemctl enable nginx
# Verify installation
curl -I http://localhostNginx creates a default configuration that serves a welcome page. Create a dedicated server block for your application:
# Create configuration file
sudo nano /etc/nginx/sites-available/yourdomain.com
server {
listen 80;
server_name yourdomain.com www.yourdomain.com;
root /var/www/yourdomain.com/html;
index index.html;
location / {
try_files $uri $uri/ =404;
}
# Security headers
add_header X-Frame-Options "SAMEORIGIN" always;
add_header X-Content-Type-Options "nosniff" always;
add_header X-XSS-Protection "1; mode=block" always;
}Enable the site by creating a symbolic link and test the configuration:
# Create document root
sudo mkdir -p /var/www/yourdomain.com/html

# Enable site
sudo ln -s /etc/nginx/sites-available/yourdomain.com /etc/nginx/sites-enabled/

# Remove default site (optional but recommended)
sudo rm /etc/nginx/sites-enabled/default

# Test configuration
sudo nginx -t

# Reload Nginx
sudo systemctl reload nginx
Setting Up Automatic Updates
Unpatched servers remain vulnerable to known exploits. Configure unattended upgrades to automatically apply security patches while minimizing disruption to your services.
# Install unattended-upgrades
sudo apt install unattended-upgrades -y

# Configure automatic updates
sudo nano /etc/apt/apt.conf.d/50unattended-upgrades
Enable automatic security updates by ensuring these lines are present and uncommented:
Unattended-Upgrade::Allowed-Origins {
    "${distro_id}:${distro_codename}";
    "${distro_id}:${distro_codename}-security";
    "${distro_id}ESMApps:${distro_codename}-apps-security";
    "${distro_id}ESM:${distro_codename}-infra-security";
};

# Optional: Auto-reboot after updates (use with caution)
Unattended-Upgrade::Automatic-Reboot "false";
Unattended-Upgrade::Automatic-Reboot-Time "02:00";
Enable the automatic update service:
# Enable updates
sudo dpkg-reconfigure -plow unattended-upgrades

# Verify status
sudo systemctl status unattended-upgrades.service
Monitoring and Maintenance
A well-configured monitoring system alerts you to issues before they become critical. Implementing basic monitoring provides visibility into your server’s health and resource utilization.
Setting Up System Metrics
Install tools to monitor system resources and track performance over time. These utilities help identify resource bottlenecks and plan capacity upgrades.
# Install monitoring tools
sudo apt install htop iotop nethogs -y

# View process and resource usage
htop

# Monitor network traffic by process
sudo nethogs eth0

# Check disk I/O
sudo iotop
For persistent monitoring, consider installing more comprehensive solutions like Prometheus with Grafana or Netdata. These tools provide historical data visualization and alerting capabilities beyond basic command-line utilities.
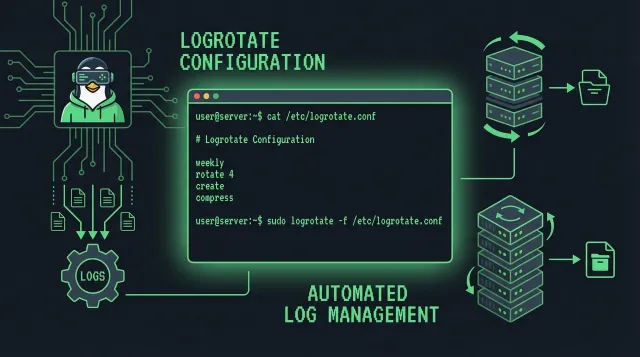
Log Management
Reviewing logs regularly helps identify issues and security threats. Configure log rotation to prevent disks from filling up with old log files.
# Check disk usage by logs
sudo du -sh /var/log

# View recent authentication attempts
sudo tail -f /var/log/auth.log

# Configure log rotation
sudo nano /etc/logrotate.conf
The default logrotate configuration handles most scenarios effectively. For high-traffic servers, consider increasing rotation frequency and reducing retention periods to manage disk usage.
Conclusion
Your Ubuntu 22.04 server is now configured with security hardening, essential services, and monitoring capabilities. The configurations in this guide represent starting points that you should adapt based on your specific requirements and compliance obligations.
Regular maintenance remains essential even with automation in place. Review log files periodically, test backup restoration procedures, and keep yourself informed about new security threats affecting your software stack. A well-maintained server provides reliable service while minimizing security risks.
Consider implementing configuration management tools like Ansible or Puppet for multi-server deployments. These tools ensure consistent configuration across your infrastructure and simplify the process of applying updates and security patches.
Related Posts: