Introduction
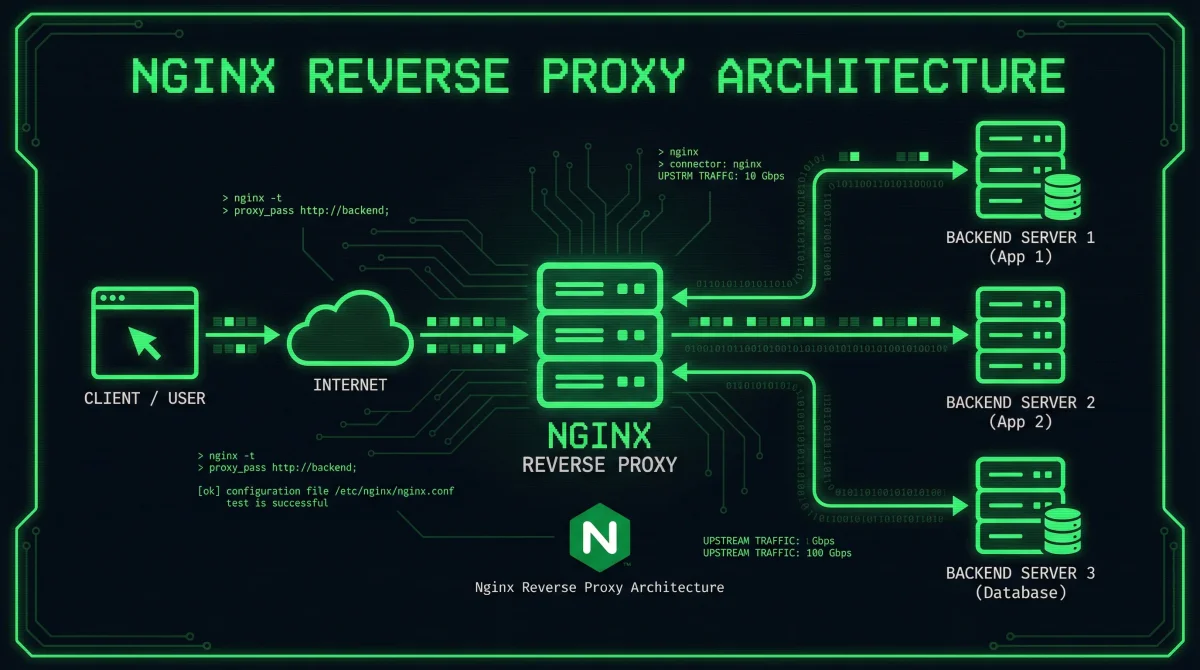
A reverse proxy is a server that sits between clients and backend servers, forwarding client requests to the appropriate backend server and returning the server’s response to the client. Nginx is one of the most popular choices for reverse proxy implementations due to its high performance, stability, and rich feature set.
This comprehensive guide will walk you through setting up Nginx as a reverse proxy, from basic configuration to advanced features like load balancing, SSL termination, and caching. Whether you’re deploying a single application or managing multiple backend services, this tutorial covers everything you need to know.
Why Use Nginx as a Reverse Proxy?
Load Distribution
Distribute incoming traffic across multiple backend servers, improving application availability and performance.
SSL/TLS Termination
Handle SSL/TLS encryption at the proxy level, reducing the computational burden on backend servers.
Security Layer
Hide backend server details from clients and add an additional security layer with features like rate limiting and access control.
Caching
Cache static content and API responses to reduce backend load and improve response times.
Centralized Logging
Collect and manage access logs from a single point, simplifying monitoring and debugging.
Prerequisites
Before starting, ensure you have:
- A Linux server (Ubuntu 22.04 recommended)
- Nginx installed (version 1.18 or higher)
- Root or sudo access
- At least one backend application running (e.g., on port 8000)
- Basic understanding of HTTP and networking concepts
Step 1: Install and Verify Nginx
First, install Nginx if you haven’t already:
# Update package lists
sudo apt update

# Install Nginx
sudo apt install nginx -y

# Verify installation
nginx -v
Check that Nginx is running:
# Check Nginx status
sudo systemctl status nginx

# If not running, start it
sudo systemctl start nginx
sudo systemctl enable nginx
Verify Nginx is accessible:
# Test from localhost
curl http://localhost

# You should see the default Nginx welcome page
Step 2: Basic Reverse Proxy Configuration
Create a new configuration file for your reverse proxy:
# Create a new site configuration
sudo nano /etc/nginx/sites-available/reverse-proxy
Add the basic reverse proxy configuration:
server {
    listen 80;
    server_name example.com www.example.com;

    location / {
        proxy_pass http://localhost:8000;
        proxy_set_header Host $host;
        proxy_set_header X-Real-IP $remote_addr;
        proxy_set_header X-Forwarded-For $proxy_add_x_forwarded_for;
        proxy_set_header X-Forwarded-Proto $scheme;
    }
}
Enable the configuration:
# Create symbolic link
sudo ln -s /etc/nginx/sites-available/reverse-proxy /etc/nginx/sites-enabled/

# Test configuration
sudo nginx -t

# Reload Nginx
sudo systemctl reload nginx
Step 3: Configure Proxy Headers
Proxy headers are essential for passing client information to backend servers. Here’s a comprehensive header configuration:
server {
    listen 80;
    server_name example.com;

    location / {
        proxy_pass http://localhost:8000;

        # Standard proxy headers
        proxy_set_header Host $host;
        proxy_set_header X-Real-IP $remote_addr;
        proxy_set_header X-Forwarded-For $proxy_add_x_forwarded_for;
        proxy_set_header X-Forwarded-Proto $scheme;
        proxy_set_header X-Forwarded-Host $host;
        proxy_set_header X-Forwarded-Port $server_port;

        # WebSocket support
        proxy_http_version 1.1;
        proxy_set_header Upgrade $http_upgrade;
        proxy_set_header Connection "upgrade";

        # Timeouts
        proxy_connect_timeout 60s;
        proxy_send_timeout 60s;
        proxy_read_timeout 60s;
    }
}
Step 4: Load Balancing Configuration
Distribute traffic across multiple backend servers:
# Define upstream servers
upstream backend {
    # Load balancing method (default: round-robin)
    least_conn;  # or ip_hash, or least_time

    server 127.0.0.1:8001 weight=3;
    server 127.0.0.1:8002 weight=2;
    server 127.0.0.1:8003 weight=1;

    # Health checks
    server 127.0.0.1:8004 max_fails=3 fail_timeout=30s;
}

server {
    listen 80;
    server_name example.com;

    location / {
        proxy_pass http://backend;
        proxy_set_header Host $host;
        proxy_set_header X-Real-IP $remote_addr;
        proxy_set_header X-Forwarded-For $proxy_add_x_forwarded_for;
    }
}
Load balancing methods:
- round-robin (default): Distributes requests evenly
- least_conn: Sends requests to server with fewest active connections
- ip_hash: Routes client to same server based on IP address
- least_time: Routes to server with lowest average response time (Nginx Plus)
Step 5: SSL/TLS Configuration
Secure your reverse proxy with SSL/TLS:
# Install Certbot for Let's Encrypt
sudo apt install certbot python3-certbot-nginx -y

# Obtain SSL certificate
sudo certbot --nginx -d example.com -d www.example.com
Manual SSL configuration:
server {
    listen 443 ssl http2;
    server_name example.com;

    # SSL certificates
    ssl_certificate /etc/ssl/certs/example.com.crt;
    ssl_certificate_key /etc/ssl/private/example.com.key;

    # SSL configuration
    ssl_protocols TLSv1.2 TLSv1.3;
    ssl_ciphers HIGH:!aNULL:!MD5;
    ssl_prefer_server_ciphers on;
    ssl_session_cache shared:SSL:10m;
    ssl_session_timeout 10m;

    location / {
        proxy_pass http://localhost:8000;
        proxy_set_header Host $host;
        proxy_set_header X-Real-IP $remote_addr;
        proxy_set_header X-Forwarded-For $proxy_add_x_forwarded_for;
        proxy_set_header X-Forwarded-Proto https;
    }
}

# Redirect HTTP to HTTPS
server {
    listen 80;
    server_name example.com;
    return 301 https://$server_name$request_uri;
}
Step 6: Caching Configuration
Implement caching to improve performance:
# Define cache path
proxy_cache_path /var/cache/nginx levels=1:2 keys_zone=my_cache:10m max_size=1g inactive=60m use_temp_path=off;

server {
    listen 80;
    server_name example.com;

    location / {
        proxy_pass http://localhost:8000;

        # Cache configuration
        proxy_cache my_cache;
        proxy_cache_valid 200 60m;
        proxy_cache_valid 404 10m;
        proxy_cache_use_stale error timeout updating http_500 http_502 http_503 http_504;
        proxy_cache_background_update on;
        proxy_cache_lock on;

        # Add cache status header
        add_header X-Cache-Status $upstream_cache_status;

        # Standard headers
        proxy_set_header Host $host;
        proxy_set_header X-Real-IP $remote_addr;
    }

    # Bypass cache for specific paths
    location /api/ {
        proxy_pass http://localhost:8000;
        proxy_cache_bypass 1;
        proxy_no_cache 1;
    }
}
Create cache directory:
sudo mkdir -p /var/cache/nginx
sudo chown www-data:www-data /var/cache/nginx
Step 7: Advanced Configuration
Rate Limiting
Protect your backend from abuse:
# Define rate limit zone
limit_req_zone $binary_remote_addr zone=mylimit:10m rate=10r/s;

server {
    listen 80;
    server_name example.com;

    location / {
        # Apply rate limit
        limit_req zone=mylimit burst=20 nodelay;

        proxy_pass http://localhost:8000;
        proxy_set_header Host $host;
    }
}
IP Whitelisting
Restrict access to specific IP addresses:
server {
    listen 80;
    server_name example.com;

    location / {
        # Allow specific IPs
        allow 192.168.1.0/24;
        allow 10.0.0.1;
        deny all;

        proxy_pass http://localhost:8000;
    }
}
Custom Error Pages
Provide better error handling:
server {
    listen 80;
    server_name example.com;

    # Custom error pages
    error_page 502 503 504 /50x.html;
    location = /50x.html {
        root /usr/share/nginx/html;
    }

    location / {
        proxy_pass http://localhost:8000;
        proxy_intercept_errors on;
    }
}
Best Practices
Use Upstream Blocks
Always define backend servers in upstream blocks for better management:
upstream app_servers {
    server 127.0.0.1:8001;
    server 127.0.0.1:8002;
    keepalive 32;
}
Enable Keepalive Connections
Reduce latency by reusing connections:
upstream backend {
    server 127.0.0.1:8000;
    keepalive 32;
}

server {
    location / {
        proxy_pass http://backend;
        proxy_http_version 1.1;
        proxy_set_header Connection "";
    }
}
Configure Appropriate Timeouts
Prevent hanging connections:
proxy_connect_timeout 60s;
proxy_send_timeout 60s;
proxy_read_timeout 60s;
send_timeout 60s;
Enable Gzip Compression
Reduce bandwidth usage:
gzip on;
gzip_vary on;
gzip_proxied any;
gzip_comp_level 6;
gzip_types text/plain text/css text/xml text/javascript application/json application/javascript application/xml+rss;
Monitor and Log
Configure detailed logging:
log_format proxy '$remote_addr - $remote_user [$time_local] '
                 '"$request" $status $body_bytes_sent '
                 '"$http_referer" "$http_user_agent" '
                 'upstream: $upstream_addr '
                 'upstream_response_time: $upstream_response_time '
                 'request_time: $request_time';

access_log /var/log/nginx/proxy_access.log proxy;
error_log /var/log/nginx/proxy_error.log warn;
Security Headers
Add security headers to protect against common attacks:
add_header X-Frame-Options "SAMEORIGIN" always;
add_header X-Content-Type-Options "nosniff" always;
add_header X-XSS-Protection "1; mode=block" always;
add_header Referrer-Policy "no-referrer-when-downgrade" always;
add_header Content-Security-Policy "default-src 'self' http: https: data: blob: 'unsafe-inline'" always;
Troubleshooting Common Issues
502 Bad Gateway Error
Problem: Nginx cannot connect to backend server.
Solutions:
# Check if backend is running
curl http://localhost:8000

# Check Nginx error logs
sudo tail -f /var/log/nginx/error.log

# Verify proxy_pass URL is correct
# Ensure firewall allows connections
sudo ufw allow 8000/tcp
504 Gateway Timeout
Problem: Backend server takes too long to respond.
Solutions:
# Increase timeout values
proxy_connect_timeout 300s;
proxy_send_timeout 300s;
proxy_read_timeout 300s;
Headers Not Passed to Backend
Problem: Backend doesn’t receive expected headers.
Solutions:
# Ensure headers are set correctly
proxy_set_header Host $host;
proxy_set_header X-Real-IP $remote_addr;

# Check if proxy_pass_request_headers is on (default)
proxy_pass_request_headers on;
WebSocket Connection Fails
Problem: WebSocket connections don’t work through proxy.
Solutions:
# Add WebSocket support
proxy_http_version 1.1;
proxy_set_header Upgrade $http_upgrade;
proxy_set_header Connection "upgrade";
Cache Not Working
Problem: Responses aren’t being cached.
Solutions:
# Check cache directory permissions
sudo chown -R www-data:www-data /var/cache/nginx

# Verify cache headers
curl -I http://example.com | grep X-Cache-Status

# Check backend isn't sending no-cache headers
Performance Optimization
Buffer Configuration
Optimize buffer sizes for your use case:
proxy_buffering on;
proxy_buffer_size 4k;
proxy_buffers 8 4k;
proxy_busy_buffers_size 8k;
Worker Processes
Configure based on CPU cores:
# In /etc/nginx/nginx.conf
worker_processes auto;
worker_connections 1024;
File Descriptor Limits
Increase system limits:
# Edit /etc/security/limits.conf
www-data soft nofile 65536
www-data hard nofile 65536

# Restart Nginx
sudo systemctl restart nginx
Conclusion
You’ve successfully learned how to configure Nginx as a reverse proxy server. This guide covered everything from basic setup to advanced features like load balancing, SSL termination, caching, and security hardening.
Key takeaways:
- Reverse proxies provide load distribution, security, and performance benefits
- Proper header configuration is essential for passing client information
- SSL/TLS termination offloads encryption from backend servers
- Caching significantly improves performance for static and semi-static content
- Rate limiting and access control protect your backend infrastructure
Start with a basic configuration and gradually add features as your needs grow. Monitor your logs, test thoroughly, and always keep security in mind.
Related Tutorials: