Docker Multi-Stage Builds: A Practical Guide to Production-Ready Images
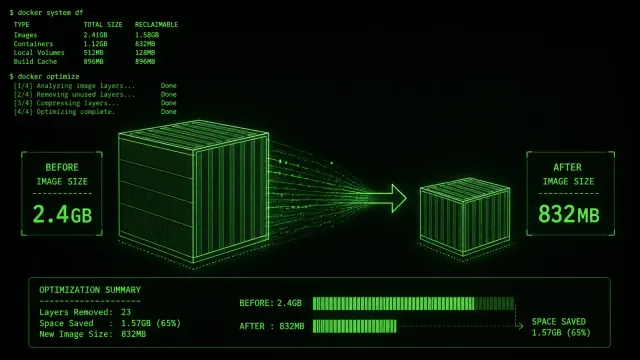
Every Docker tutorial starts with a Dockerfile. Most of them produce images that are 800MB to 2GB. That’s fine for learning, but in production, those bloated images slow down deployments, increase attack surface, and waste storage. Multi-stage builds fix this problem by separating the build process from the runtime environment.
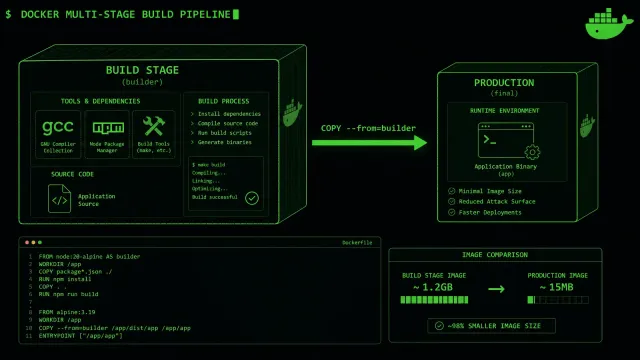
The concept is simple: use one stage to compile and build your application, then copy only the compiled output into a minimal final image. The build tools, compilers, and source code never make it into production. The result is an image that’s 60-90% smaller and significantly more secure.
This guide covers the practical details of implementing multi-stage builds for real production workloads. We’ll look at common patterns, caching strategies, and the security benefits that make this approach worth adopting.
The problem with single-stage Dockerfiles
Most developers start with a Dockerfile that looks something like this:
FROM node:20
WORKDIR /app
COPY package*.json ./
RUN npm ci
COPY . .
RUN npm run build
CMD ["node", "dist/index.js"]
This works, but the final image contains everything: Node.js, npm, all the dev dependencies, the source code, build tools, test files, and the compiled output. If you’re building a TypeScript application, you have the TypeScript compiler sitting in your production image doing nothing. If you’re using webpack or Vite, the bundler is just taking up space.
The image size matters more than you might think. A 1.2GB Node.js image means longer pull times during deployments. In a rolling deployment with 10 instances, you’re transferring 12GB of data. With a 150MB multi-stage image, you’re transferring 1.5GB. That’s the difference between a 30-second deployment and a 5-minute one.
How multi-stage builds work
A multi-stage Dockerfile uses multiple FROM instructions. Each FROM starts a new build stage. You can name stages and selectively copy artifacts between them using the COPY --from instruction.
Here’s the same Node.js application using a multi-stage build:
# Build stage
FROM node:20 AS builder
WORKDIR /app
COPY package*.json ./
RUN npm ci
COPY . .
RUN npm run build

# Production stage
FROM node:20-slim
WORKDIR /app
COPY --from=builder /app/dist ./dist
COPY --from=builder /app/node_modules ./node_modules
COPY package*.json ./
RUN npm ci --omit=dev
CMD ["node", "dist/index.js"]
The build stage installs everything needed to compile the application. The production stage starts fresh with a slim base image, copies only the compiled output and production dependencies, and runs the application. The TypeScript compiler, test framework, and build tools are gone.
The difference is dramatic. The single-stage image might be 1.2GB. The multi-stage version is typically 150-200MB. For Go or Rust applications, the difference is even more extreme: a 1GB build image produces a 10-20MB final binary.
Choosing the right base images
The base image you choose for each stage matters. Common patterns:
Build stage: Use the full language image (node:20, python:3.12, golang:1.22). These include compilers, build tools, and everything needed to build your application.
Production stage: Use slim or alpine variants (node:20-slim, python:3.12-slim, alpine). These strip out build tools, documentation, and other unnecessary packages. For Go applications, you can even use scratch as the final stage since Go binaries are statically linked.
Alpine images are popular because they’re tiny (5-15MB base size), but they use musl libc instead of glibc. This works for most applications, but some native modules or compiled dependencies might need glibc. If you hit compatibility issues, switch to slim variants instead.
The tradeoff is straightforward: Alpine gives you the smallest images but occasionally causes compatibility headaches. Slim gives you nearly the same size reduction with better compatibility. For production, slim is usually the safer choice unless you’ve tested extensively with Alpine.
Caching strategies that actually work
BuildKit, which has been the default builder since Docker 23.0, gives you powerful caching tools. The most impactful is cache mounts, which persist directories across builds:
FROM node:20 AS builder
WORKDIR /app
COPY package*.json ./
RUN --mount=type=cache,target=/root/.npm npm ci
COPY . .
RUN --mount=type=cache,target=/root/.npm npm run build
Without cache mounts, every code change forces a fresh npm ci installation. With cache mounts, npm’s package cache persists between builds, and npm ci only downloads packages that aren’t already cached. This can cut build times by 40-70% on repeat builds.
Another important optimization is ordering your COPY instructions from least to most frequently changing. Docker caches each instruction as a layer. If you copy source code before running npm ci, any source code change invalidates the npm ci cache. Put package.json and lock file copies first, then copy source code after the dependency installation:
FROM node:20 AS builder
WORKDIR /app
COPY package*.json ./
RUN npm ci
COPY . .
RUN npm run build
If only your source code changes, Docker reuses the cached npm ci layer and only rebuilds from the COPY step onward.
For Python projects, pip cache mounts work the same way:
FROM python:3.12 AS builder
WORKDIR /app
COPY requirements.txt ./
RUN --mount=type=cache,target=/root/.cache/pip pip install -r requirements.txt
COPY . .
RUN python -m py_compile main.py
Docker Build Cloud, launched in 2025, extends this caching across your entire team. Build caches are shared through a remote registry, so when one developer builds an image, the cache layers are available to everyone else on the team. This is especially valuable in CI/CD pipelines where builds happen on different machines.
Multi-stage builds for compiled languages
Go and Rust applications benefit the most from multi-stage builds because the compiler produces a single binary with no runtime dependencies.
Go example:
FROM golang:1.22 AS builder
WORKDIR /app
COPY go.mod go.sum ./
RUN go mod download
COPY . .
RUN CGO_ENABLED=0 go build -o server ./cmd/server

FROM scratch
COPY --from=builder /app/server /server
ENTRYPOINT ["/server"]
The final image contains nothing but the compiled binary. No operating system, no shell, no runtime. The image size is typically 10-20MB. The scratch base means there’s no shell to exec into, which improves security but makes debugging harder. If you need a shell for debugging, use alpine instead of scratch for the final stage.
Rust follows the same pattern. The build stage uses the full rust image with cargo. The final stage copies only the compiled binary into alpine or scratch.
Security implications
Multi-stage builds aren’t just about size. They’re a significant security improvement. When your production image doesn’t contain compilers, build tools, or source code, there’s less for an attacker to exploit.
If an attacker gains access to a container running a single-stage image, they have access to the full development toolchain. They can compile and run arbitrary code, read your source code, and use build tools to create exploits. In a multi-stage image with a minimal runtime, the attacker’s options are severely limited.
Docker Scout, which is integrated into Docker Desktop and Docker Hub, can scan your images for known vulnerabilities. You’ll typically see 30-50% fewer vulnerabilities in a multi-stage image compared to a single-stage equivalent, simply because there are fewer packages installed. A Node.js image with dev dependencies might have 200+ known vulnerabilities. The same application in a multi-stage slim image might have 30 or fewer.
The supply chain security implications are also worth noting. When you copy compiled artifacts from a build stage, you’re not copying the build tools themselves. If those tools have vulnerabilities, they don’t exist in your production image. This creates a natural boundary between development and production security postures.
Building for different architectures
Multi-stage builds work well with cross-compilation. If you need to build for multiple architectures (amd64 and arm64), you can use a build stage that cross-compiles and a runtime stage that uses the appropriate base image:
FROM --platform=linux/amd64 golang:1.22 AS builder
ARG TARGETARCH
WORKDIR /app
COPY . .
RUN CGO_ENABLED=0 GOOS=linux GOARCH=${TARGETARCH} go build -o server

FROM alpine:3.19
COPY --from=builder /app/server /server
ENTRYPOINT ["/server"]
Docker buildx handles the platform selection automatically. BuildKit compiles the binary for the target architecture in the build stage, and the runtime stage uses the matching base image. This produces correctly architected images without needing to build on the target platform.
.dockerignore optimization
Before Docker even starts building, it sends the build context to the daemon. If your project has node_modules, .git, test files, and documentation, you’re sending gigabytes of unnecessary data. A well-crafted .dockerignore file can reduce your build context by 50-80%.
Essential entries for most projects:
node_modules
.git
.gitignore
*.md
.env
.env.*
docker-compose*.yml
Dockerfile*
.dockerignore
dist
build
coverage
.nyc_output
test
tests
__tests__
The .dockerignore works like .gitignore. Without it, every build starts by transferring all those files to the Docker daemon, which wastes time and can expose sensitive files if you accidentally reference them in your Dockerfile.
Production checklist
Before deploying a multi-stage image to production, verify these items:
First, check the image size. Run docker images and compare with your previous single-stage image. You should see a 60-90% reduction.
Second, scan for vulnerabilities. Run docker scout cves <image> or use Trivy to check for known security issues. Multi-stage builds should produce significantly fewer findings.
Third, test the image in a staging environment. Just because the image is smaller doesn’t mean it works correctly. Verify that all runtime dependencies are present and the application starts properly.
Fourth, check that health checks work. Add a HEALTHCHECK instruction to your Dockerfile so orchestrators can monitor container health:
HEALTHCHECK --interval=30s --timeout=3s --retries=3 \
  CMD curl -f http://localhost:8080/health || exit 1
Fifth, pin your base image versions. Use node:20.11-slim instead of node:20-slim to ensure reproducible builds. A patch update to the base image can introduce unexpected changes.
Common mistakes to avoid
The most frequent mistake is copying too much into the final stage. Only copy what the application needs at runtime. Don’t copy the entire build directory if you only need the dist folder.
Another mistake is installing dev dependencies in the production stage. If you’re using npm, use npm ci --omit=dev. For Python, use pip install --no-deps and install only runtime packages. Forgetting this step is the most common reason multi-stage images end up larger than expected.
Don’t forget to set the correct working directory and user in the final stage. Running containers as root is a security risk. Create a non-root user in the final stage and switch to it:
FROM node:20-slim
RUN groupadd -r appuser && useradd -r -g appuser appuser
WORKDIR /app
COPY --from=builder --chown=appuser:appuser /app/dist ./dist
COPY --from=builder --chown=appuser:appuser /app/node_modules ./node_modules
USER appuser
CMD ["node", "dist/index.js"]
This small addition prevents container escape attacks that rely on root privileges.
A less obvious mistake is neglecting to clean up build artifacts before copying them. Even in a multi-stage build, you might copy test results, temporary files, or build logs into the final stage if you’re not careful about what you COPY. Be explicit about which files and directories you’re copying, and use .dockerignore to exclude build artifacts from the build context in the first place.
When not to use multi-stage builds
Multi-stage builds aren’t always necessary. If you’re building a simple script or a small utility that doesn’t have a build step, a single-stage Dockerfile is fine. The overhead of managing multiple stages adds complexity without benefit in these cases.
Similarly, if you’re using pre-built images as base images and just adding configuration files or scripts, multi-stage builds don’t help. The optimization only applies when you’re compiling or building something that can be separated from the runtime environment.
The goal is production-ready images that are as small and secure as possible. For anything with a compilation step, multi-stage builds are the standard approach. For simple configurations, keep it simple. The right Dockerfile is the one that’s maintainable by your team and produces an image that meets your security and performance requirements. Multi-stage builds are a powerful tool, but like any tool, they work best when applied where they provide genuine value.