Pull a Docker image and check its size. If it’s over 500MB for a web application, or over 1GB for anything with Python dependencies, your images are bloated. The consequences aren’t cosmetic at all. Bloated images mean slower pulls from registries, longer CI/CD pipelines, more disk usage on production servers, and larger attack surfaces. Every extra megabyte is a liability that costs you time and money.
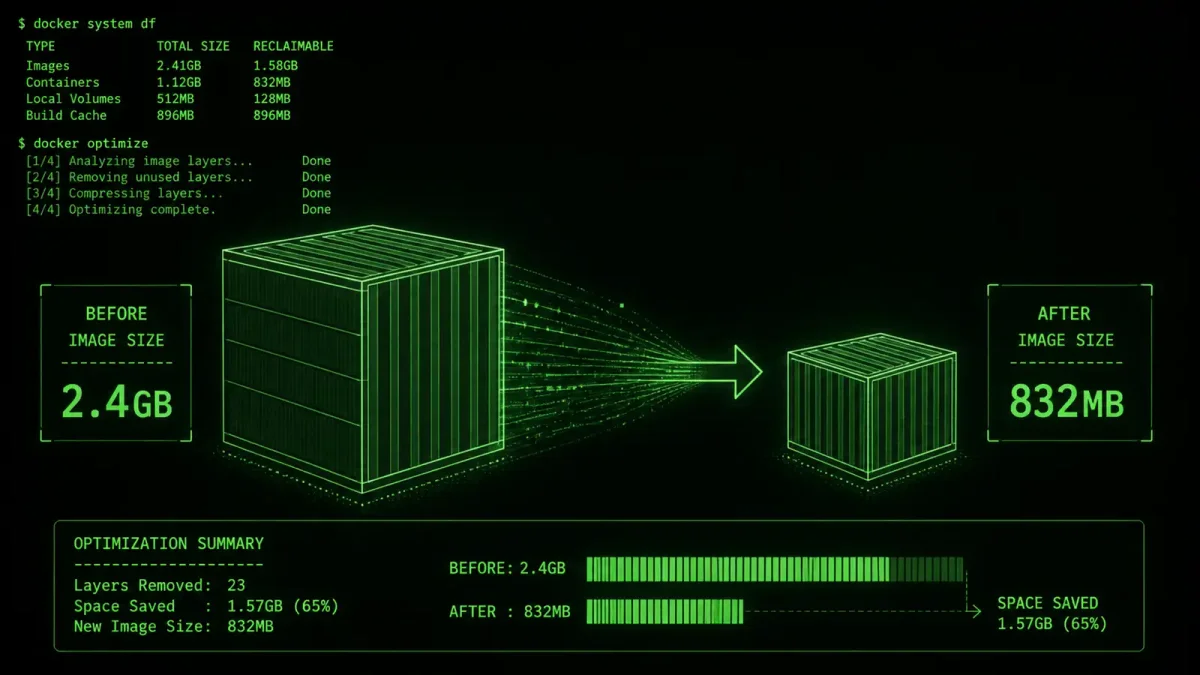
The good news: most of that bloat is entirely unnecessary. Two techniques, used together, can cut image sizes by 60-80% with minimal changes to your workflow. Slim base images handle the easy wins. Multi-stage builds handle the harder ones. Together, they turn a 2.4GB image into an 832MB image without sacrificing functionality.
Why your Docker images are bloated
Docker images accumulate weight for predictable reasons. The base image ships with tools you don’t need. Build dependencies get left in the final image. Python packages install with cached wheels and development headers. Node.js projects include devDependencies alongside production dependencies. Each layer adds to the total, and Docker only downloads the layers that changed.
The common FROM python:3.10 image weighs about 1GB. That’s before you install a single dependency. FROM node:20 is similar. These images include compilers, debuggers, documentation, and a full Debian or Ubuntu distribution with every standard tool. Your application doesn’t need most of it. The python:3.10 image ships with gcc, make, libssl-dev, libffi-dev, and dozens of other development packages that exist solely to help compile C extensions during pip install. Once the extensions are compiled, those tools serve no purpose at runtime.
The second problem is layer caching. Every RUN instruction creates a new layer. If you copy your requirements file, install dependencies, then copy your application code, a code change invalidates the dependency layer and forces a rebuild. Developers respond by combining everything into fewer RUN instructions, which makes the Dockerfile harder to read and makes caching less effective. The better approach is to structure your Dockerfile so that changes to application code don’t invalidate the dependency installation layer.
The third problem is the build context. When you run docker build ., Docker sends the entire directory to the daemon. If you haven’t set up .dockerignore, that includes .git, node_modules, test fixtures, documentation, and anything else sitting in the project root. A project with a 500MB .git directory sends all of it to the Docker daemon on every build, even if the Dockerfile doesn’t reference any of it. The build context bloats the image if you copy everything, and it slows down every build even if you don’t.
Slim base images: the easy win
The simplest optimization is switching from a full base image to a slim variant. Instead of FROM python:3.10, use FROM python:3.10-slim. Instead of FROM node:20, use FROM node:20-slim. The slim variants strip out development tools, compilers, and unnecessary system packages while keeping the runtime libraries your application actually needs.
The size difference is dramatic. python:3.10 is about 1GB. python:3.10-slim is about 150MB. That’s an 85% reduction with a single word change. For Node.js, the difference is similar: node:20 at about 1GB versus node:20-slim at about 200MB. Alpine variants go even further: python:3.10-alpine is about 50MB, but the musl libc compatibility issues make it a poor choice for many Python packages.
The trade-off is that slim images don’t include compilers or development headers. If your Python package has C extensions that need to compile during installation, you’ll need to add gcc, build-essential, and the relevant -dev packages. This is where multi-stage builds come in, because you can install those tools in a build stage and leave them out of the final image.
For applications that don’t need compilation, the switch to slim is a no-brainer. You get faster pulls, smaller registries, and reduced attack surface. The runtime behavior is identical because the same Python or Node.js interpreter runs your code. The slim image just doesn’t have the extra tools that nobody uses at runtime anyway.
Multi-stage builds: the real power
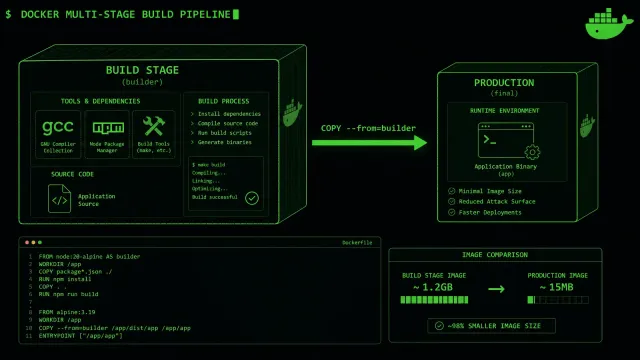
Multi-stage builds solve the problem that slim images create. You need build tools to compile dependencies, but you don’t need those tools in the final image. A multi-stage Dockerfile separates the build environment from the runtime environment.
Here’s the pattern:
# Stage 1: Build
FROM python:3.10-slim AS builder
RUN apt-get update && apt-get install -y gcc build-essential
WORKDIR /app
COPY requirements.txt .
RUN pip install --no-cache-dir --prefix=/install -r requirements.txt

# Stage 2: Runtime
FROM python:3.10-slim
COPY --from=builder /install /usr/local
COPY . /app
WORKDIR /app
CMD ["python", "app.py"]
The first stage installs the compiler and builds the dependencies. The second stage starts fresh with a clean slim image and copies only the compiled artifacts. The compiler, build headers, and intermediate files never make it into the final image.
The result is an image that’s small, clean, and only contains what the application needs at runtime. Build time is often faster too, because Docker can cache the build stage separately from the runtime stage.
For more complex projects, you can chain multiple build stages. A common pattern uses one stage for frontend assets (Node.js builds React components) and another for the backend (Python or Go), then combines them in the final stage. Each stage stays cached independently, so changing the frontend code doesn’t force a rebuild of the backend dependencies. This separation keeps builds fast and images clean, even in monorepo projects where multiple services share a single Dockerfile.
A practical example: from 2.4GB to 832MB
Let’s walk through a real optimization. A machine learning project starts with FROM pytorch/pytorch:2.1.0-cuda12.1-cudnn8-runtime. That’s 2.4GB. The application needs PyTorch, transformers, and a few utility libraries. The Dockerfile copies requirements, installs everything, copies the model and application code, and runs the server. The resulting image works, but it’s enormous.
Step one: switch to a slim base. FROM pytorch/pytorch:2.1.0-cuda12.1-cudnn8-runtime becomes a multi-stage build where the first stage uses the full PyTorch image to install dependencies with compilation, and the second stage uses a slim CUDA runtime image. The build stage has the compilers and headers needed to compile C extensions. The runtime stage doesn’t.
Step two: split the requirements. Runtime requirements (what the application actually imports) go in a separate file from build requirements (compilers, headers, test tools). The build stage installs both. The runtime stage installs only runtime requirements from pre-compiled wheels. This separation prevents build tools from leaking into the final image.
Step three: use --no-cache-dir for pip and --rm for apt. This prevents pip from caching downloaded packages and removes apt lists after installation. Each technique saves 50-200MB depending on the dependencies. Combined, they can shave 300MB off a Python image.
Step four: add a .dockerignore file. Exclude .git, __pycache__, *.pyc, tests/, docs/, and any other files the application doesn’t need at runtime. This reduces the build context and prevents test files from ending up in the image. A typical .dockerignore for a Python project saves 10-50MB of context.
The final image comes in at 832MB, down from 2.4GB. Build time is 23 seconds, faster than the original because Docker caches the build stage. The application runs identically because the same PyTorch runtime and CUDA libraries are present. The difference is that the compiler, build headers, and intermediate files that were necessary for building but useless for running are no longer in the image.
Docker-specific gotchas that trip up production
Optimizing the image size is only part of the story. Several Docker-specific behaviors cause problems in production that aren’t obvious during development.
The :latest tag is the most common trap. When your Dockerfile says FROM python:3.10-slim, Docker pulls whatever 3.10-slim resolves to at build time. A week later, that tag might point to a different patch version. Your locally built image works, but the CI-built image breaks because a dependency compiled against a different Python patch. Pin your base images to specific versions: FROM python:3.10.14-slim-bookworm.
GPU configuration is another frequent issue. If your container needs CUDA, the base image must include the right CUDA toolkit version, and the host must have matching NVIDIA drivers. Use nvidia-docker runtime or the --gpus flag. Check that your container can actually see the GPU with docker run --gpus all nvidia/cuda:12.1.0-base-ubuntu22.04 nvidia-smi. If that fails, nothing else matters.
Model loading strategy matters for inference containers. Loading a model on every request adds seconds of latency. Load the model once during container startup, warm it up with a test inference, then serve traffic. This keeps containers stateless for scaling while avoiding the cold-start penalty.
Finally, don’t run as root. Add a RUN useradd -m appuser and USER appuser to your Dockerfile. Running as root inside a container is safer than running as root on the host, but it’s still a risk if the container escapes. Most base images already have a non-root user you can switch to.
The monitoring gap
You can optimize your images perfectly and still fail in production if you don’t monitor them. Containers that work in development often behave differently under load, with different resource constraints, and across restarts.
At minimum, every production container needs structured logging. Write logs to stdout/stderr, not to files inside the container. Docker captures stdout and sends it to your logging driver. If you write to a file inside the container, the logs disappear when the container is recreated.
Resource limits prevent one container from starving others on the same host. Set --memory and --cpus flags or use resource limits in your Docker Compose file. Without limits, a memory leak in one container can crash the host. With limits, the container gets OOM-killed instead, which is recoverable.
Health checks tell Docker when a container is unhealthy and needs to be restarted. Add a HEALTHCHECK instruction to your Dockerfile or a healthcheck section to your Docker Compose file. Without health checks, Docker keeps routing traffic to a container that’s stopped responding. With them, Docker restarts the container automatically.
The monitoring stack matters too. Prometheus with cAdvisor gives you container-level metrics. Loki with Promtail gives you log aggregation. Together, they tell you not just that a container is running, but whether it’s actually working. A container that’s technically up but returning 500 errors is worse than a container that’s down, because the load balancer keeps sending traffic to it.
Optimize your images, configure your containers properly, and monitor them continuously. That’s the full picture. The 832MB image is smaller, faster to pull, and easier to audit. But it only matters if the container inside it is running correctly, handling traffic, and surviving failures.