Introduction
SSH serves as the primary gateway for server administration in Linux environments. Default SSH configurations expose servers to credential stuffing attacks, brute force attempts, and unauthorized access attempts that compromise system security. Hardening SSH configurations reduces attack surface while maintaining necessary administrative access.
This guide covers comprehensive SSH security measures from basic configuration changes through advanced防护 techniques. We examine authentication methods, access controls, and monitoring strategies that protect production servers from common attack vectors. Each recommendation includes implementation details suitable for Ubuntu, Debian, CentOS, and RHEL distributions.
Security through obscurity provides minimal protection; defense-in-depth strategies combine multiple security layers. SSH hardening integrates with broader server security practices including firewall configuration, intrusion detection, and audit logging. We build toward configurations that meet compliance requirements while enabling efficient administrative workflows.
Strengthening SSH Authentication
Password authentication remains vulnerable to credential attacks regardless of password complexity. Key-based authentication provides cryptographic proof of identity that resists brute force and credential theft.
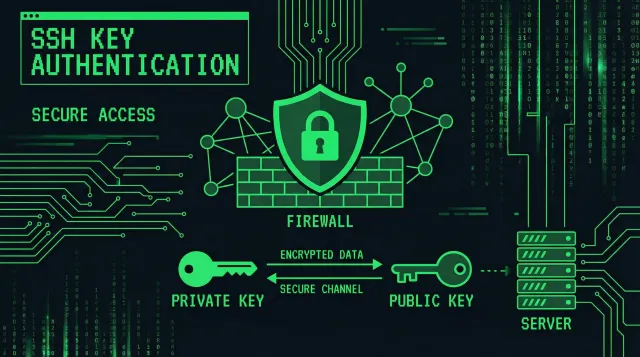
Implementing SSH Key Authentication
SSH keys use asymmetric cryptography to authenticate connections. Private keys remain securely on administrator workstations while public keys distribute to servers. This separation prevents credential interception from network attacks.
# Generate Ed25519 key (preferred modern algorithm)
ssh-keygen -t ed25519 -a 100 -f ~/.ssh/serverhi-prod

# Alternatively generate RSA key (4096 bits for compatibility)
ssh-keygen -t rsa -b 4096 -a 100 -f ~/.ssh/serverhi-rsa

# Copy public key to server
ssh-copy-id -i ~/.ssh/serverhi-prod.pub user@server.example.com

# Manually append public key to server
cat ~/.ssh/serverhi-prod.pub >> ~/.ssh/authorized_keys
chmod 600 ~/.ssh/authorized_keys
chmod 700 ~/.ssh
Ed25519 keys offer equivalent security to RSA with smaller key sizes and faster operations. RSA keys with 4096-bit lengths provide broader compatibility with older systems. Both algorithms resist current cryptanalysis capabilities when implemented correctly.
Protect private keys with strong passphrases and restrictive file permissions:
# Verify private key permissions (must be 600)
ls -la ~/.ssh/serverhi-prod

# Add key to SSH agent for session convenience
ssh-add ~/.ssh/serverhi-prod

# List loaded keys
ssh-add -l
Disabling Password Authentication
After verifying key authentication works, disable password-based authentication to eliminate credential-based attack vectors:
# Edit SSH daemon configuration
sudo nano /etc/ssh/sshd_config

# Configuration changes:
# PasswordAuthentication no
# ChallengeResponseAuthentication no
# UsePAM no

# Verify configuration syntax
sudo sshd -t

# Reload SSH daemon
sudo systemctl reload sshd
Test key authentication before disabling passwords. Locked out servers require console access for recovery. Maintain alternative access methods during configuration changes.
Configuring Key-Specific Options
Individual keys can receive specific restrictions that limit their usefulness if compromised. Restrict keys to specific commands, source addresses, or validity periods:
# Restrict key to specific IP address
from="192.168.1.100" ssh-ed25519 AAAA... user@workstation

# Restrict key to specific command
command="/usr/bin/htop" ssh-ed25519 AAAA... monitoring@server

# Restrict key to SFTP only
command="internal-sftp" -s ssh-ed25519 AAAA... sftp-user@server
The from field restricts connections to specific source addresses, preventing key use from unauthorized locations. The command field limits key usage to specific operations, useful for automated scripts and monitoring integrations.
Server Configuration Hardening
SSH daemon configuration controls connection behavior, authentication methods, and available features. Optimizing these settings reduces exposure while maintaining functionality.
Essential Security Settings
Create a hardened SSH daemon configuration that implements multiple security layers:
# /etc/ssh/sshd_config security settings

# Protocol and listening configuration
Protocol 2
AddressFamily inet
ListenAddress 0.0.0.0
ListenAddress ::

# Authentication settings
PermitRootLogin no
MaxAuthTries 3
MaxSessions 10
PubkeyAuthentication yes
PasswordAuthentication no
PermitEmptyPasswords no
ChallengeResponseAuthentication no
KbdInteractiveAuthentication no
UsePAM yes

# Connection settings
ClientAliveInterval 300
ClientAliveCountMax 2
TCPKeepAlive yes

# Logging and monitoring
SyslogFacility AUTH
LogLevel INFO

# Access control
AllowUsers admin@192.168.1.0/24 deploy@10.0.0.0/8
DenyUsers root@0.0.0.0/0

# Feature restrictions
X11Forwarding no
AllowTcpForwarding no
PermitTunnel no

# Banner configuration
Banner /etc/ssh/banner.txt
The AllowUsers directive creates an allowlist of permitted users with optional source restrictions. Combining user and source restrictions provides strong access control. The AllowUsers admin@192.168.1.0/24 entry permits only the admin user from the internal network.
Rate Limiting and Connection Controls
Connection rate limiting prevents brute force attacks by limiting connection attempts from single sources:
# Configure systemd rate limiting
sudo systemctl edit sshd.socket

# Add rate limiting configuration
[Socket]
ListenStream=22
BindAddress=0.0.0.0
ListenStream=2222
BindAddress=0.0.0.0

MaxConnectionsPerSource=10

[Install]
WantedBy=sockets.target
Alternative rate limiting uses firewall rules for more granular control:
# UFW rate limiting for SSH
sudo ufw limit 22/tcp

# iptables rate limiting
sudo iptables -A INPUT -p tcp --dport 22 -m state \
  --state NEW -m recent --set
sudo iptables -A INPUT -p tcp --dport 22 -m state \
  --state NEW -m recent --update \
  --seconds 60 --hitcount 4 -j DROP
These rules permit four connection attempts per minute from each source address. Attackers cannot complete credential attempts before connections drop, preventing both successful authentication and resource exhaustion.
Configuring Connection Idle Timeouts
Idle connections waste resources and present security risks if administrators forget to disconnect. Configure timeouts that balance accessibility with security:
# Add to sshd_config
ClientAliveInterval 300      # 5 minutes
ClientAliveCountMax 2        # 2 checks = 10 minutes total

# Or set shorter timeouts for high-security environments
ClientAliveInterval 60       # 1 minute
ClientAliveCountMax 3        # 3 checks = 3 minutes total
Client alive messages sent from the server detect disconnected clients. After configured failures, the server terminates sessions. This mechanism differs from TCP keepalive and operates at the application level.
Implementing Fail2Ban
Fail2Ban monitors log files and temporarily bans IP addresses exhibiting malicious behavior. Integrating Fail2Ban with SSH provides automated defense against connection attacks.
Installing and Configuring Fail2Ban
Install Fail2Ban from distribution repositories and configure SSH protection:
# Ubuntu/Debian
sudo apt update
sudo apt install fail2ban

# RHEL/CentOS
sudo yum install epel-release
sudo yum install fail2ban

# Enable and start service
sudo systemctl enable fail2ban
sudo systemctl start fail2ban
Create a local configuration that overrides default settings:
# /etc/fail2ban/jail.local
[DEFAULT]
bantime = 3600           # 1 hour ban
findtime = 600           # within 10 minutes
maxretry = 3             # 3 failures triggers ban
ignoreip = 127.0.0.1/8 10.0.0.0/8 192.168.0.0/16
backend = auto

[sshd]
enabled = true
port = ssh
filter = sshd
logpath = /var/log/auth.log
maxretry = 3
findtime = 300
bantime = 3600
action = iptables-multiport[name=ssh, port="22", protocol=tcp]
Configuration settings control ban behavior. The bantime determines how long offending IPs remain blocked. The findtime window counts failures; reaching maxretry within the window triggers the ban. Longer windows detect slower attacks while shorter windows prevent rapid credential testing.
Customizing Fail2Ban Actions
Modify Fail2Ban behavior through custom actions that integrate with existing infrastructure:
# Create custom action for Slack notifications
# /etc/fail2ban/action.d/slack.conf
[Definition]
actionstart = curl -s -X POST \
  --data-urlencode "payload={\"text\":\"Fail2Ban started on <hostname>\"}" \
  https://hooks.slack.com/services/YOUR/SLACK/WEBHOOK

actionban = curl -s -X POST \
  --data-urlencode "payload={\"text\":\"Banned <ip> for SSH brute force attempt on <hostname>\"}" \
  https://hooks.slack.com/services/YOUR/SLACK/WEBHOOK

actionunban = curl -s -X POST \
  --data-urlencode "payload={\"text\":\"Unbanned <ip> on <hostname>\"}" \
  https://hooks.slack.com/services/YOUR/SLACK/WEBHOOK

# Apply custom action to SSH jail
[sshd]
enabled = true
action = slack
             iptables-multiport[name=ssh, port="22", protocol=tcp]
Integration with monitoring systems enables rapid response to attack patterns. Slack, PagerDuty, and other alerting platforms receive notifications when Fail2Ban detects attacks. This visibility helps identify sustained attacks requiring additional response.
Monitoring Fail2Ban Status
Regular monitoring ensures Fail2Ban operates correctly and reveals attack patterns:
# Check current SSH jail status
sudo fail2ban-client status sshd

# View all jail statuses
sudo fail2ban-client status

# Check system logs for Fail2ban activity
sudo journalctl -u fail2ban -f

# Manually unban an IP (use sparingly)
sudo fail2ban-client set sshd unbanip 203.0.113.50
Log analysis reveals attack sources and intensity. Sustained attacks from specific IP ranges may warrant firewall rules beyond Fail2Ban time-limited bans. Coordinate Fail2Ban configuration with broader network security monitoring.
Advanced Security Measures
Beyond basic hardening, advanced measures provide additional protection layers for high-security environments.
Two-Factor Authentication Integration
Two-factor authentication adds a second verification layer beyond key-based authentication. Several TOTP and FIDO2 solutions integrate with SSH:
# Install Google Authenticator PAM module
sudo apt install libpam-google-authenticator

# Configure PAM for SSH
# Add to /etc/pam.d/sshd:
# auth required pam_google_authenticator.so

# Update sshd_config to enable challenge response
# ChallengeResponseAuthentication yes
# AuthenticationMethods publickey,keyboard-interactive
Users generate initial secrets using the Google Authenticator app:
# Each user runs on the server
google-authenticator

# Creates ~/.google_authenticator file
# Provides QR code and recovery codes
Test two-factor authentication carefully before deploying. Recovery codes provide emergency access if authentication devices are lost. Store recovery codes securely but accessibly for emergency situations.
SSH Bastion Host Configuration
Bastion hosts provide controlled access to internal networks, acting as jump servers that aggregate administrative access:
# Bastion host /etc/ssh/sshd_config
PermitRootLogin no
PasswordAuthentication no
AllowTcpForwarding no
X11Forwarding no
AllowUsers bastion-user@admin-workstation

# Internal host configuration
# Allow connections only from bastion
AllowUsers webapp@10.0.1.10 database@10.0.1.20

# Internal hosts accept connections from bastion IP
Bastion hosts centralize logging, monitoring, and access control for administrative connections. Network segmentation ensures internal services remain inaccessible from the internet. This architecture limits attack surface while maintaining necessary administrative access.
Certificate-Based Authentication
Enterprise environments benefit from SSH certificates that simplify key management and enable centralized access control:
# Create certificate authority key
ssh-keygen -t ed25519 -f /etc/ssh/ca -C "Corporate CA"

# Sign user public keys with CA
ssh-keygen -s /etc/ssh/ca -I "alice@engineering" \
  -n alice -V +52w \
  -I "bob@devops" \
  -n bob -V +26w \
  user_keys.pub

# Configure servers to trust CA
# TrustedUserCAKeys /etc/ssh/ca.pub
# AuthorizedPrincipalsFile /etc/ssh/auth_principals/%u

# User connects with certificate
ssh -i ~/.ssh/id_ed25519-cert.pem server.example.com
Certificates expire after configured periods, eliminating long-term key management. Principals in certificates define user permissions, enabling role-based access without individual key distribution. Certificate revocation requires maintaining Certificate Revocation Lists (CRLs) or Online Certificate Status Protocol (OCSP) services.
Auditing and Monitoring SSH Activity
Comprehensive logging enables incident investigation and compliance verification. Configure logging that captures necessary detail without overwhelming storage.
Configuring SSH Logging
Enhance SSH logging to capture connection details, authentication events, and session activity:
# /etc/ssh/sshd_config logging improvements
LogLevel VERBOSE

# Session logging (requires additional configuration)
# Log session input/output with care - may contain sensitive data
# PrintLastLog yes
# PrintMotd no

# Configure rsyslog for SSH logging
# /etc/rsyslog.d/10-ssh.conf
:programname,isequal,"sshd" /var/log/sshd.log
& stop
Verbose logging captures key exchange details, fingerprint verification, and connection metadata. Balance logging verbosity against storage costs and privacy considerations. Some environments require extensive logging for compliance; others may limit logging to essential security events.
Session Recording and Playback
Recording terminal sessions provides audit trails for privileged access. Several tools enable session recording with varying capabilities:
# Using tlog (Terminal I/O Logging)
# Part of the SCAP Security Guide ecosystem

# Install tlog
sudo apt install tlog-tool tlog-rec-session

# Configure /etc/bash.bashrc for all users
export TLOG_REC=user
export TLOG_REC_FILE="/var/log/tlog/session-\$(whoami)-\$(date +\%Y\%m\%d-\%H\%M\%S).txt"

# Session playback using tlog
tlog-play --session=/var/log/tlog/session-alice-20260208-141523.txt
Session recordings capture exactly what administrators see and type, providing detailed audit trails. Store recordings securely with appropriate access controls. Implement retention policies that balance audit requirements against storage costs.
Log Analysis and Alerting
Automated log analysis identifies suspicious activity faster than manual review. SIEM tools and log aggregation platforms enable sophisticated analysis:
# Simple log analysis with journalctl
# Show failed login attempts
journalctl _SYSTEMD_UNIT=sshd.service | grep "Failed password"

# Show connections from unusual locations
journalctl _SYSTEMD_UNIT=sshd.service | grep Accepted | \
  awk '{print $9}' | sort | uniq -c | sort -rn

# Monitor real-time connections
journalctl -f -u sshd
Pattern recognition identifies attack signatures and anomalous behavior. Multiple failed attempts from various IPs suggest credential stuffing. Single IPs attempting many usernames indicate targeted reconnaissance. Geographic anomalies flag connections from unexpected locations.
Conclusion
SSH hardening provides essential protection for servers accessible via remote administration. Key-based authentication, restricted configurations, and automated defense systems create layered security that resists common attack patterns. Implementation requires balancing security requirements against operational accessibility.
Regular security reviews verify that hardening measures remain effective as threats evolve. Update SSH configurations when new vulnerabilities emerge or authentication methods become outdated. Maintain access procedures that balance security with emergency response requirements.
Combine SSH hardening with broader server security practices including firewall configuration, intrusion detection, and security monitoring. Defense-in-depth strategies ensure that single point failures do not compromise overall security posture.
Related Posts: