Most infrastructure teams still run Terraform from a developer laptop or a CI job that triggers terraform apply after a PR merge. That works until someone forgets to run plan on the latest commit, or two people apply conflicting changes at the same time. GitOps solves this by making Git the single source of truth for everything, with a controller (ArgoCD in this case) responsible for reconciliation rather than manual pushes.
This guide covers the full setup: structuring a monorepo with Terraform and Kubernetes manifests, installing ArgoCD, connecting the two, and handling the drift detection loop that makes the whole thing reliable.
Why GitOps Changes How Teams Work
Traditional infrastructure management has a fundamental problem: the gap between what you think is running and what is actually running. Someone SSHs into a server, makes a change, and nobody else knows about it until something breaks at 2am. GitOps eliminates this by making every change go through a pull request. You get a diff, a review, an approval trail, and an automatic rollback if something goes wrong.
The model works because Git already solves most of the hard problems. Version control gives you history. Pull requests give you review. Branches give you isolation. Merge conflicts give you collision detection. You are not adopting a new tool so much as extending the tool you already trust to cover infrastructure as well as application code.
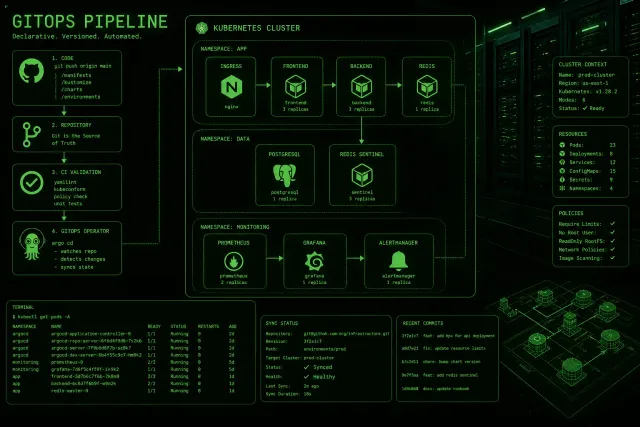
ArgoCD sits in the middle as the reconciler. It watches your Git repository and compares what is in the manifests against what is actually running in the cluster. When it finds a difference, it either reports it or fixes it, depending on your configuration. This is fundamentally different from a CI pipeline that runs kubectl apply once and walks away. ArgoCD is always watching, always comparing, always correcting.
What You’ll Build
You’ll walk away with:
- A Git repo containing Terraform modules for cloud infrastructure and Kubernetes manifests for application deployments
- ArgoCD installed on a Kubernetes cluster, configured to watch the repo
- An ArgoCD Application resource that syncs Kubernetes manifests automatically
- A workflow for making changes: edit Git, review the diff, merge, and let ArgoCD apply
Prerequisites
Before starting, make sure you have:
- A Kubernetes cluster running (minikube or kind for local testing, EKS/GKE/AKS for production)
kubectlconfigured to talk to the clusterterraform1.8+ installedargoCLI installed (available via Homebrew, apt, or the official releases page)- A GitHub or GitLab repository where you can push
Step 1: Structure the GitOps Repository
A common mistake is mixing Terraform files and Kubernetes manifests in the same directory. They have different lifecycles, different audiences, and different failure modes. Keep them separate.
mkdir gitops-infra && cd gitops-infra
git init

mkdir -p terraform/environments/production
mkdir -p terraform/modules/vpc
mkdir -p terraform/modules/eks
mkdir -p kubernetes/apps/production
mkdir -p kubernetes/base
The terraform/ directory holds all infrastructure-as-code. The kubernetes/ directory holds the manifests that ArgoCD will sync. This separation matters because Terraform manages cloud resources (VPCs, EKS clusters, IAM roles), while ArgoCD manages what runs inside the cluster (Deployments, Services, Ingresses).
Step 2: Write the Terraform Configuration
Start with a simple VPC and EKS cluster configuration. In terraform/environments/production/main.tf:
terraform {
  required_version = ">= 1.8.0"

  required_providers {
    aws = {
      source  = "hashicorp/aws"
      version = "~> 5.40"
    }
  }

  backend "s3" {
    bucket         = "mycompany-terraform-state"
    key            = "production/terraform.tfstate"
    region         = "us-east-1"
    dynamodb_table = "terraform-locks"
    encrypt        = true
  }
}

provider "aws" {
  region = var.region
}

module "vpc" {
  source = "../../modules/vpc"

  environment = "production"
  vpc_cidr    = "10.0.0.0/16"
  azs         = ["us-east-1a", "us-east-1b", "us-east-1c"]
}

module "eks" {
  source = "../../modules/eks"

  cluster_name    = "production-cluster"
  cluster_version = "1.30"
  vpc_id          = module.vpc.vpc_id
  subnet_ids      = module.vpc.private_subnet_ids
}
In the same directory, define your variables in variables.tf:
variable "region" {
  description = "AWS region"
  type        = string
  default     = "us-east-1"
}
And outputs in outputs.tf:
output "cluster_endpoint" {
  value = module.eks.cluster_endpoint
}

output "cluster_name" {
  value = module.eks.cluster_name
}
Initialize and apply the Terraform configuration:
cd terraform/environments/production
terraform init
terraform plan -out=tfplan
terraform apply tfplan
This creates the actual infrastructure: a VPC with public and private subnets, an EKS cluster with managed node groups, and the required IAM roles. The state file lives in S3 with DynamoDB locking to prevent concurrent applies.
Step 3: Write the Kubernetes Manifests
Now create the application manifests that ArgoCD will manage. In kubernetes/apps/production/nginx-deployment.yaml:
apiVersion: apps/v1
kind: Deployment
metadata:
  name: nginx-web
  namespace: production
  labels:
    app: nginx-web
spec:
  replicas: 3
  selector:
    matchLabels:
      app: nginx-web
  template:
    metadata:
      labels:
        app: nginx-web
    spec:
      containers:
        - name: nginx
          image: nginx:1.27-alpine
          ports:
            - containerPort: 80
          resources:
            requests:
              memory: "64Mi"
              cpu: "50m"
            limits:
              memory: "128Mi"
              cpu: "100m"
          readinessProbe:
            httpGet:
              path: /
              port: 80
            initialDelaySeconds: 5
            periodSeconds: 10
          livenessProbe:
            httpGet:
              path: /
              port: 80
            initialDelaySeconds: 10
            periodSeconds: 30
In kubernetes/apps/production/nginx-service.yaml:
apiVersion: v1
kind: Service
metadata:
  name: nginx-web
  namespace: production
spec:
  selector:
    app: nginx-web
  ports:
    - port: 80
      targetPort: 80
  type: ClusterIP
And kubernetes/apps/production/namespace.yaml:
apiVersion: v1
kind: Namespace
metadata:
  name: production
Create a kustomization file to group these together, in kubernetes/apps/production/kustomization.yaml:
apiVersion: kustomize.config.k8s.io/v1beta1
kind: Kustomization
resources:
  - namespace.yaml
  - nginx-deployment.yaml
  - nginx-service.yaml
Commit and push everything to your repository:
git add .
git commit -m "Initial repo structure: Terraform + Kubernetes manifests"
git push origin main
Step 4: Install ArgoCD on Your Cluster
Connect to your cluster and install ArgoCD. The fastest path is the standard manifest:
kubectl create namespace argocd
kubectl apply -n argocd -f https://raw.githubusercontent.com/argoproj/argo-cd/stable/manifests/install.yaml
Wait for the pods to come up:
kubectl wait --for=condition=Ready pods --all -n argocd --timeout=300sFor local development with kind or minikube, set up port forwarding to access the dashboard:
kubectl port-forward svc/argocd-server -n argocd 8080:443Now retrieve the initial admin password:
kubectl -n argocd get secret argocd-initial-admin-secret -o jsonpath="{.data.password}" | base64 -dUse admin as the username and this password to log in at https://localhost:8080. The certificate will be self-signed, so you’ll need to accept the browser warning.
After logging in, change the password immediately:
argocd account update-password --account adminStep 5: Connect ArgoCD to Your Git Repository
ArgoCD needs credentials to read from your Git repository. For a public repo, you can skip this step. For private repos, register the repository:
argocd repo add https://github.com/yourorg/gitops-infra.git \
  --username yourgithubuser \
  --password your-personal-access-token
The token needs repo scope. Generate one in GitHub under Settings > Developer settings > Personal access tokens.
Step 6: Create the ArgoCD Application
The Application CRD tells ArgoCD which repo to watch, which path contains manifests, and which cluster to deploy to. Create argocd-app.yaml:
apiVersion: argoproj.io/v1alpha1
kind: Application
metadata:
  name: production-nginx
  namespace: argocd
spec:
  project: default
  source:
    repoURL: https://github.com/yourorg/gitops-infra.git
    targetRevision: main
    path: kubernetes/apps/production
  destination:
    server: https://kubernetes.default.svc
    namespace: production
  syncPolicy:
    automated:
      prune: true
      selfHeal: true
    syncOptions:
      - CreateNamespace=true
    retry:
      limit: 3
      backoff:
        duration: 5s
        factor: 2
        maxDuration: 1m
Apply this to your cluster:
kubectl apply -f argocd-app.yamlWhat happens next:
- ArgoCD clones the repo and reads the manifests in
kubernetes/apps/production/ - It creates the
productionnamespace (becauseCreateNamespace=true) - It deploys the nginx Deployment and Service
- It starts a reconciliation loop that polls the repo every 3 minutes
The automated sync policy means ArgoCD applies changes without manual approval. The prune: true flag deletes resources that have been removed from Git. The selfHeal: true flag reverts manual changes made directly to the cluster.
Step 7: Test the GitOps Loop
Verify everything is deployed:
kubectl get pods -n production
argocd app get production-nginx
You should see three nginx pods running and the ArgoCD app showing Synced status.
Now test the loop. Edit the nginx deployment to change the image tag:
# Edit kubernetes/apps/production/nginx-deployment.yaml
# Change nginx:1.27-alpine to nginx:1.28-alpine
git add kubernetes/apps/production/nginx-deployment.yaml
git commit -m "Update nginx to 1.28"
git push origin main
Within 3 minutes (the default polling interval), ArgoCD detects the change, runs a diff, and syncs the new image to the cluster. You can also trigger an immediate sync:
argocd app sync production-nginxCheck the rollout:
kubectl rollout status deployment/nginx-web -n productionHandling Drift: What Happens When Someone Runs kubectl edit
Run this to test self-heal:
kubectl set image deployment/nginx-web nginx=nginx:1.25 -n productionArgoCD detects the drift on its next reconciliation cycle and reverts the change. The app status will show Degraded briefly, then return to Synced. This is the core value of GitOps: the cluster state always matches what’s in Git.
If you need to make emergency changes directly, you can temporarily disable self-heal:
argocd app set production-nginx --sync-option Heal=falseRemember to re-enable it after the emergency is resolved.
Integrating Terraform with the GitOps Flow
Terraform and ArgoCD serve different purposes, but you can connect them. The approach is to have a CI pipeline run terraform plan on PRs and terraform apply on merge, while ArgoCD handles Kubernetes deployments independently.
A typical GitHub Actions workflow for the Terraform side:
name: Terraform
on:
  push:
    branches: [main]
    paths: ['terraform/**']
  pull_request:
    branches: [main]
    paths: ['terraform/**']

jobs:
  terraform:
    runs-on: ubuntu-latest
    defaults:
      run:
        working-directory: terraform/environments/production

    steps:
      - uses: actions/checkout@v4

      - uses: hashicorp/setup-terraform@v3
        with:
          terraform_version: "1.8.0"

      - name: Terraform Init
        run: terraform init

      - name: Terraform Plan
        if: github.event_name == 'pull_request'
        run: terraform plan -no-color
        continue-on-error: true

      - name: Terraform Apply
        if: github.ref == 'refs/heads/main' && github.event_name == 'push'
        run: terraform apply -auto-approve
The key point: Terraform changes and Kubernetes manifest changes are separate PRs with separate pipelines. A change to VPC CIDR blocks goes through Terraform. A change to pod replicas or container images goes through Kubernetes manifests. They don’t step on each other.
Adding Auto-Sync with Webhooks
Polling every 3 minutes works, but webhooks make it faster. In your GitHub repo, go to Settings > Webhooks > Add webhook:
- Payload URL:
https://argocd.yourdomain.com/api/webhook - Content type:
application/json - Events: Just the push event
- Secret: Set a strong random string
Then configure ArgoCD to accept the webhook:
# In argocd-cm ConfigMap (argocd namespace)
apiVersion: v1
kind: ConfigMap
metadata:
  name: argocd-cm
  namespace: argocd
data:
  webhook.events: |
    - push
After this, ArgoCD syncs within seconds of a push rather than waiting for the polling interval.
Monitoring and Notifications
Install ArgoCD Notifications to get alerted on sync failures:
kubectl apply -n argocd -f https://raw.githubusercontent.com/argoproj/argo-cd/stable/manifests/notifications.yamlConfigure a Slack notification in the argocd-notifications-cm ConfigMap:
apiVersion: v1
kind: ConfigMap
metadata:
  name: argocd-notifications-cm
  namespace: argocd
data:
  service.slack: |
    token: $slack-token
    signingSecret: $slack-signing-secret
  template.app-sync-failed: |
    message: |
      Application {{.app.metadata.name}} sync failed.
      Revision: {{.app.status.sync.revision}}
      Details: {{.app.status.operationState.message}}
  trigger.on-sync-failed: |
    - when: app.status.sync.status == 'Synced' and app.status.health.status == 'Degraded'
      send: [app-sync-failed]
Apply the secret with your Slack token:
kubectl create secret generic argocd-notifications-secret \
  --from-literal=slack-token=xoxb-your-token \
  -n argocd
Managing Secrets in a GitOps Workflow
The biggest objection to storing everything in Git is secrets. You cannot commit database passwords, API keys, or TLS certificates to a public repository. There are three common approaches, and most production setups use a combination of them.
The first is Sealed Secrets. You install a controller in your cluster that can decrypt SealedSecret resources using a key pair. You encrypt your secrets locally with the public key, commit the encrypted version to Git, and the controller in the cluster decrypts it. The private key never leaves the cluster. This works well for simple setups but adds a dependency on the sealing controller.
The second is External Secrets Operator. Instead of storing secrets in Git at all, you store them in a vault (AWS Secrets Manager, HashiCorp Vault, Azure Key Vault) and use a Kubernetes custom resource to pull them in. The ExternalSecret resource in Git tells the operator which secret to fetch and where to put it. The actual secret value never touches Git. This is the most secure option for production.
The third is SOPS with age or KMS encryption. You encrypt the secret values in a YAML file using a key that only your CI system or cluster has access to. The encrypted file goes into Git. ArgoCD uses a plugin to decrypt during sync. This is simpler than External Secrets but requires managing the encryption key separately.
For this guide, the Kubernetes manifests we created do not contain secrets. In a real project, you would add ExternalSecret resources alongside your Deployments, and the External Secrets Operator would handle the rest.
Setting Up Rollbacks
One of the strongest arguments for GitOps is that rollbacks are just Git operations. If a deployment goes wrong, you revert the commit and push. ArgoCD detects the change and rolls the cluster back to the previous state. No SSH, no manual kubectl rollback, no guessing what version was running before.
To test this, make a breaking change to your nginx deployment:
# Change the image to something that does not exist
image: nginx:nonexistent-tag
Push the change. ArgoCD will attempt to sync, the pods will fail to start, and the app status will show Degraded. Now revert:
git revert HEAD
git push origin main
ArgoCD syncs the revert, the old image is restored, and the pods come back up. The entire incident is captured in Git history with timestamps and who pushed what.
For more sophisticated rollbacks, ArgoCD maintains a history of sync operations. You can view it in the UI or with the CLI:
argocd app history production-nginx
argocd app rollback production-nginx <revision-id>
This lets you roll back to any previous sync state without touching Git, which is useful when you need to undo a change quickly and investigate later.
Multi-Environment Promotions
In practice, you rarely deploy directly to production. A typical setup has staging and production environments, with changes promoted from staging to production after validation. ArgoCD handles this with separate Application resources pointing to different paths or branches.
The directory structure becomes:
kubernetes/
  apps/
    staging/
      nginx-deployment.yaml
      nginx-service.yaml
      kustomization.yaml
    production/
      nginx-deployment.yaml
      nginx-service.yaml
      kustomization.yaml
Create a second ArgoCD Application for staging:
apiVersion: argoproj.io/v1alpha1
kind: Application
metadata:
  name: staging-nginx
  namespace: argocd
spec:
  project: default
  source:
    repoURL: https://github.com/yourorg/gitops-infra.git
    targetRevision: main
    path: kubernetes/apps/staging
  destination:
    server: https://kubernetes.default.svc
    namespace: staging
  syncPolicy:
    automated:
      prune: true
      selfHeal: true
The promotion workflow is: edit the staging manifests, push, verify in staging, then copy the same change to the production directory and push again. Some teams automate this with a promotion bot that creates a PR from staging to production manifests automatically.
Common Pitfalls
Forgetting to create the backend state bucket. Terraform needs an S3 bucket and DynamoDB table for state locking. Create them before running terraform init:
aws s3api create-bucket \
  --bucket mycompany-terraform-state \
  --region us-east-1

aws dynamodb create-table \
  --table-name terraform-locks \
  --attribute-definitions AttributeName=LockID,AttributeType=S \
  --key-schema AttributeName=LockID,KeyType=HASH \
  --billing-mode PAY_PER_REQUEST \
  --region us-east-1
ArgoCD can’t pull private images. If your container images are in a private registry, create an image pull secret and reference it in the deployment spec, or use an ImageUpdater plugin.
Merge conflicts in Terraform state. If two people try to apply Terraform changes simultaneously, the DynamoDB lock prevents corruption but one person’s apply will fail. This is correct behavior. Don’t force-unlock the state unless you’re sure the lock is orphaned.
Permissions. ArgoCD’s ServiceAccount needs write access to the target namespaces. If you see forbidden errors in the sync logs, check the RBAC bindings. The default installation grants broad permissions, but production clusters should have tighter restrictions.
Wrapping Up
The core principle is straightforward: Git is the source of truth, ArgoCD makes the cluster match Git, and Terraform makes the cloud infrastructure match what Kubernetes needs. Changes flow through PRs, get reviewed, and are applied automatically once merged.
The real benefit shows up after three months, not three hours. When someone asks “who changed the deployment replicas?” or “what’s different between staging and production?” or “can we roll back that image change?” you check Git history. There’s no SSH into servers, no kubectl apply from someone’s terminal, no undocumented manual steps.
Start with a single application, get the sync loop working, then expand to the rest of your stack. GitOps is a practice you adopt incrementally, not a switch you flip.