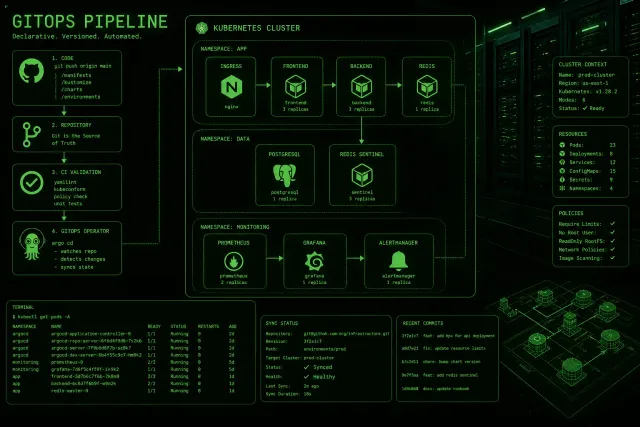
If you’re already using Flux CD for GitOps on Kubernetes, you’ve seen how declarative deployments work. Argo CD takes a similar approach but with a different philosophy: a full-featured web UI, a strong focus on application-level management, and a reconciliation engine that’s become the default choice for many enterprise teams. Where Flux leans toward composable CRDs and a CLI-first workflow, Argo CD gives you a visual dashboard that shows exactly what’s deployed, what’s out of sync, and what needs attention.
This guide walks through installing Argo CD on a Kubernetes cluster, connecting it to a Git repository, deploying your first application, and configuring the settings you’ll need for production use.
Prerequisites
You need a running Kubernetes cluster. For local development, minikube or kind work fine. For this tutorial, I’m using a kind cluster because it starts faster and handles port mapping cleanly. If you’re on a cloud-managed cluster (EKS, GKE, AKS), make sure you have kubectl configured with the right context.
You also need kubectl, Helm 3, and a Git repository where you’ll store your Kubernetes manifests. The repository can be public or private, but Argo CD needs read access to it.
Installing Argo CD
The standard installation uses the official Argo CD manifest. Create a dedicated namespace first, then apply the manifests:
kubectl create namespace argocd
kubectl apply -n argocd -f https://raw.githubusercontent.com/argoproj/argo-cd/stable/manifests/install.yaml
This installs all Argo CD components: the API server, the application controller, the repo server, and the Redis cache. The installation takes about 2-3 minutes depending on your cluster’s internet connectivity.
For production environments, use the Helm chart instead because it gives you more control over resource limits, persistence, and ingress configuration:
helm repo add argo https://argoproj.github.io/argo-helm
helm install argocd argo/argo-cd --namespace argocd --create-namespace \
  --set server.service.type=LoadBalancer \
  --set server.extraArgs[0]="--insecure"
The --insecure flag disables TLS on the server, which you’ll want behind a reverse proxy that handles TLS termination. Don’t use this flag if Argo CD is exposed directly to the internet.
After installation, verify all pods are running:
kubectl get pods -n argocdYou should see pods for argocd-server, argocd-repo-server, argocd-application-controller, argocd-redis, and argocd-dex-server. All should be in Running state within a few minutes.
Accessing the Web UI
Argo CD runs its server on port 443 (HTTPS) and 80 (HTTP). For local development, port-forward to access the UI:
kubectl port-forward svc/argocd-server -n argocd 8080:443Open https://localhost:8080 in your browser. The initial admin password is the name of the Argo CD server pod:
kubectl -n argocd get secret argocd-initial-admin-secret -o jsonpath="{.data.password}" | base64 -dLog in with username admin and the retrieved password. Change this password immediately in a production environment. You can also configure SSO through Dex, which Argo CD includes by default.
The dashboard shows an empty state with no applications. That’s expected. The next step is connecting a Git repository and creating your first application.
Connecting a Git Repository
Argo CD supports GitHub, GitLab, Bitbucket, and any Git-compatible repository. For public repositories, you just need the URL. For private repositories, you’ll need to configure credentials.
Public Repository (Quick Start)
If your manifests are in a public repository, Argo CD can access them immediately. No additional configuration needed.
Private Repository with SSH
Store your SSH private key as a Kubernetes secret:
kubectl create secret generic repo-ssh-key \
  --from-file=sshPrivateKey=~/.ssh/id_rsa \
  --namespace argocd
Then reference it when adding the repository through the UI or CLI. The Argo CD CLI (argocd) simplifies this:
argocd repo add git@github.com:your-org/your-repo.git \
  --ssh-private-key-path ~/.ssh/id_rsa
Private Repository with HTTPS Token
For HTTPS repositories with personal access tokens:
argocd repo add https://github.com/your-org/your-repo.git \
  --username your-username \
  --password your-token
Deploying Your First Application
The simplest way to create an application is through the UI, but the CLI gives you more control and is easier to automate.
Application Manifest
Create an application.yaml file:
apiVersion: argoproj.io/v1alpha1
kind: Application
metadata:
  name: my-app
  namespace: argocd
spec:
  project: default
  source:
    repoURL: https://github.com/your-org/your-manifests.git
    targetRevision: HEAD
    path: apps/my-app
  destination:
    server: https://kubernetes.default.svc
    namespace: my-app
  syncPolicy:
    automated:
      prune: true
      selfHeal: true
    syncOptions:
      - CreateNamespace=true
Apply it:
kubectl apply -f application.yamlWithin 30 seconds, Argo CD will detect the application, fetch the manifests from your repository, and deploy them to your cluster. The UI updates in real-time to show the sync status.
What Each Field Does
The source section tells Argo CD where to find your manifests. repoURL is your Git repository, targetRevision is the branch or tag (HEAD means the default branch), and path is the directory within the repository containing your Kubernetes manifests.
The destination section specifies where to deploy. server is the Kubernetes API server URL (use https://kubernetes.default.svc for in-cluster deployments), and namespace is the target namespace.
The syncPolicy section controls how Argo CD manages the deployment. automated.prune: true means Argo CD will delete resources that are removed from Git. automated.selfHeal: true means it will revert manual changes to match the Git state. CreateNamespace=true creates the target namespace if it doesn’t exist.
Sync Policies in Depth
Argo CD offers several sync modes, and choosing the right one matters for production.
Manual sync is the default. Argo CD detects drift between Git and the cluster, but it won’t automatically fix it. You click “Sync” in the UI or run argocd app sync to apply changes. This gives you full control but requires human intervention for every deployment.
Automated sync makes Argo CD continuously reconcile the cluster state with Git. When you push a change to your manifests repository, Argo CD detects it and applies the changes automatically. The selfHeal option reverts any manual changes made directly to the cluster. The prune option deletes resources that no longer exist in Git.
Automated sync with limits lets you set conditions for when automation kicks in. For example, you can restrict automated sync to specific branches or require that all health checks pass before syncing.
For most teams, automated sync with selfHeal and prune enabled is the right starting point. It means Git is the single source of truth, and any divergence is automatically corrected.
Managing Applications with the CLI
The Argo CD CLI provides commands for managing applications without the UI:
# List all applications
argocd app list

# Get application details
argocd app get my-app

# Sync an application manually
argocd app sync my-app

# View application logs
argocd app logs my-app

# Delete an application
argocd app delete my-app
The CLI is especially useful for CI/CD pipelines where you want to trigger deployments programmatically. You can use argocd app sync in a GitHub Action or GitLab CI pipeline to trigger deployments after your image build completes.
Configuring RBAC
Argo CD has its own RBAC system separate from Kubernetes RBAC. By default, the admin user has full access, but you’ll want to create role-based policies for team members.
Argo CD policies are defined in the argocd-rbac-cm ConfigMap:
apiVersion: v1
kind: ConfigMap
metadata:
  name: argocd-rbac-cm
  namespace: argocd
data:
  policy.default: role:readonly
  policy.csv: |
    p, role:developer, applications, get, */*, allow
    p, role:developer, applications, sync, */*, allow
    p, role:developer, applications, create, */*, allow
    g, developers, role:developer
This creates a developer role that can view, sync, and create applications but cannot delete them. The role:readonly default means anyone not explicitly assigned a role can only view applications.
For more granular control, you can scope policies to specific projects, repositories, or clusters. Argo CD’s project system lets you partition applications by team, environment, or any other dimension.
Health Checks and Resource Tracking
Argo CD tracks the health of every resource it manages. A resource can be Healthy, Progressing, Degraded, Missing, or Unknown. The UI shows health status with color coding, and you can configure notifications based on health changes.
Argo CD determines health by checking resource-specific conditions. For Deployments, it looks at the replica rollout status. For Services, it checks if endpoints are populated. For Pods, it examines readiness conditions. If a resource is Degraded, Argo CD highlights it in the UI and you can drill into the events to diagnose the issue.
This health tracking is more granular than what Flux provides out of the box. It’s one reason many teams choose Argo CD for production environments where visibility into deployment state matters.
Notifications
Argo CD can send notifications to Slack, email, Teams, or other services when applications sync, fail, or change health status. Configure notifications through the argocd-notifications-cm ConfigMap and define templates for different event types.
A basic Slack notification for sync failures:
apiVersion: v1
kind: ConfigMap
metadata:
  name: argocd-notifications-cm
  namespace: argocd
data:
  trigger.on-sync-failed: |
    - when: app.status.sync.status == 'OutOfSync'
      send: [slack-notification]
  template.slack-notification: |
    message: |
      Application {{.app.metadata.name}} sync failed.
      Repository: {{.app.spec.source.repoURL}}
      Revision: {{.app.status.sync.revision}}
Notifications help catch deployment issues before users report them. In a production setup, you’ll want notifications for sync failures, health degradation, and resource pruning events.
Comparing Argo CD with Flux CD
Both tools solve the same problem: keeping your Kubernetes cluster state in sync with a Git repository. The differences are in approach and feature set.
Argo CD provides a full web UI, application-level management, RBAC, SSO integration, and multi-cluster support out of the box. Flux is more modular, with separate components for source management, kustomize/helm rendering, and notifications. Flux is lighter and more composable; Argo CD is more opinionated and feature-complete.
For teams that want a visual dashboard and built-in RBAC, Argo CD is the better choice. For teams that prefer composable CRDs and want to build their own control plane, Flux fits better. Many organizations use both: Flux for cluster-level infrastructure and Argo CD for application deployments.
Production Checklist
Before using Argo CD in production, make sure you’ve addressed these items:
- Change the default admin password and enable SSO
- Configure RBAC with least-privilege roles for each team
- Set up persistent storage for the Redis cache
- Configure ingress with TLS termination
- Set resource requests and limits for all Argo CD pods
- Enable notifications for sync failures and health degradation
- Configure backup for the Argo CD database
- Set up monitoring for Argo CD’s own metrics (it exposes Prometheus metrics by default)
- Use projects to partition applications by team or environment
- Consider using ApplicationSets for managing multiple similar applications
Conclusion
Argo CD brings GitOps to Kubernetes with a focus on visibility and control. The web UI makes it easy to see what’s deployed and what’s out of sync. The CLI and API make it easy to automate. The RBAC and project system make it easy to manage access in larger organizations. The reconciliation engine runs continuously, checking your cluster state against Git every three minutes by default, and you can adjust that interval based on how quickly you need changes reflected.
For teams already running Kubernetes and looking to formalize their deployment process, Argo CD is one of the most mature and well-supported options available. Combined with a Git repository as the single source of truth, it removes the manual steps and tribal knowledge that typically surround production deployments.
The learning curve is modest if you’re already comfortable with Kubernetes and Git. The hardest part is usually getting the Git repository structure right, because Argo CD expects your manifests organized in a way that maps cleanly to applications and environments. Start simple, with one application per directory, and expand from there as your needs grow. The official Argo CD documentation at argo-cd.readthedocs.io covers advanced topics like multi-source applications, progressive rollouts, and custom resource health checks that go beyond what this guide covers. Once you’ve got a working setup, experiment with ApplicationSets to manage multiple environments from a single template.