Why Flux CD?
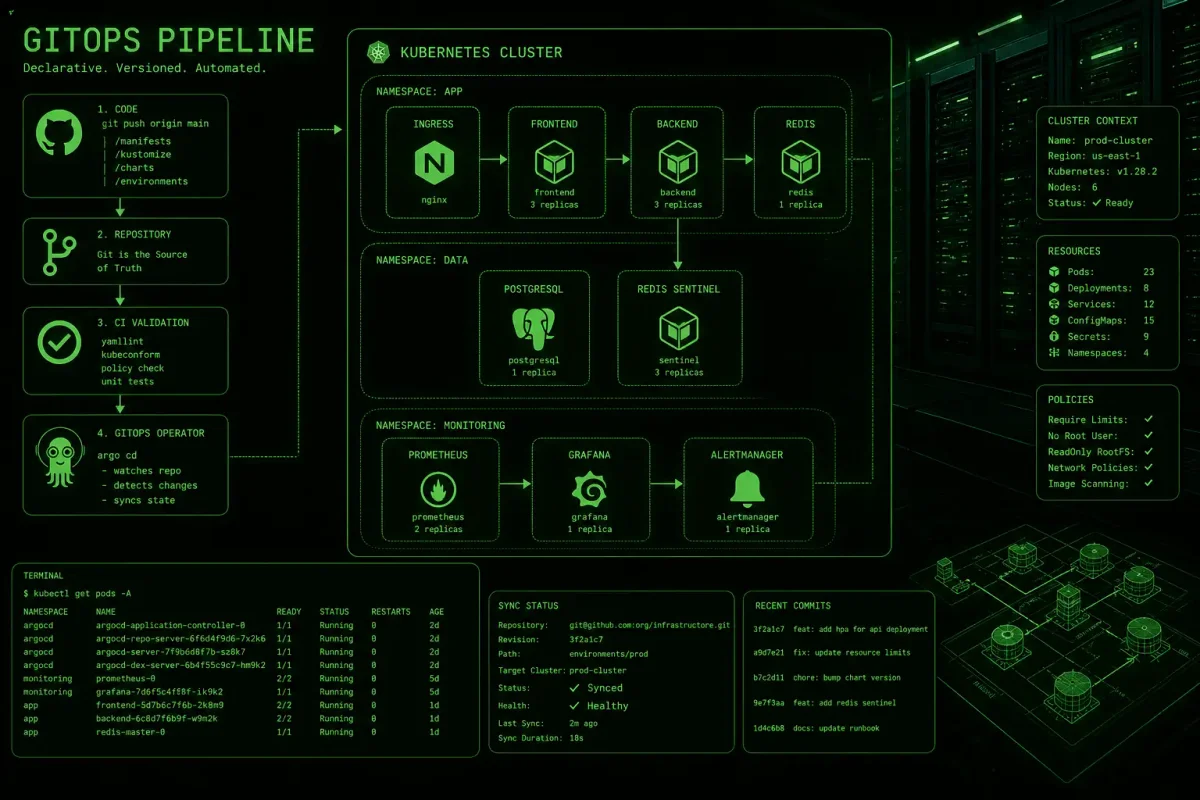
You push code. The cluster should match. That’s GitOps in one sentence — and Flux CD is the tool that makes it happen.
Flux CD is a CNCF Graduated project (same tier as Kubernetes itself) that watches your Git repositories and keeps your cluster in sync with whatever you commit. No manual kubectl apply. No deploy scripts that drift over time. Just git push and wait.
ArgoCD gets most of the attention — it has the flashy web UI, 23k GitHub stars, and DAG visualizations. But Flux takes a different approach: it runs as a set of lightweight controllers inside your cluster, no external control plane needed. If your cluster is up, GitOps is running. That simplicity matters when you’re managing edge deployments, air-gapped environments, or just want fewer moving parts.
This guide walks through bootstrapping Flux on a real cluster, syncing an application from a Git repo, and setting up image automation so new container tags hit production without manual YAML edits.
Prerequisites
You need a cluster and a Git repo. We’ll use kind (Kubernetes IN Docker) for the cluster and GitHub for the repo, but Flux works with GitLab, Bitbucket, Azure DevOps, or any Git server you point it at.
# Install kind if you don't have it
curl -Lo ./kind https://kind.sigs.k8s.io/dl/v0.20.0/kind-linux-amd64
chmod +x ./kind
sudo mv ./kind /usr/local/bin/

# Create a cluster
kind create cluster --name flux-demo

# Verify it's running
kubectl cluster-info --context kind-flux-demo
You’ll also need a GitHub personal access token with repo permissions. Create one at Settings → Developer settings → Personal access tokens → Fine-grained tokens. Give it read/write access to your repository contents and administration.
Install the Flux CLI
The flux CLI is your primary interface for bootstrapping, inspecting, and troubleshooting.
# Download and install
curl -s https://fluxcd.io/install.sh | sudo bash

# Verify
flux --version
# Output: flux version 2.4.0

# Optional: enable shell completions
echo 'source <(flux completion bash)' >> ~/.bashrc
The CLI also runs pre-flight checks before bootstrapping — it verifies your cluster is reachable, checks for existing Flux installations, and confirms the target Git provider credentials work.
Bootstrap Flux on Your Cluster
Bootstrapping does three things: installs the Flux controllers on your cluster, creates a Git repository (or connects to an existing one), and links the two together so Flux manages itself.
export GITHUB_TOKEN=<your-token>
export GITHUB_USER=<your-username>

flux bootstrap github \
  --owner=$GITHUB_USER \
  --repository=flux-demo-config \
  --branch=main \
  --path=./clusters/demo \
  --personal
Here’s what happens under the hood when you run that command:
- Flux creates the
flux-demo-configrepository on GitHub (or connects to it if it already exists) - It installs the Flux controllers —
source-controller,kustomize-controller,helm-controller,notification-controller— in theflux-systemnamespace - It commits the Flux component manifests and sync configuration to the repo
- It creates a deploy key and adds it to the repo so Flux can pull without personal tokens
Once bootstrapped, Flux is self-managing. Bumping the Flux version is a Git operation — update the version in the repo and Flux reconciles itself.
Check that everything came up:
flux get allYou should see the source-controller pulling from your config repo, and the kustomize-controller applying manifests from the ./clusters/demo path.
The Reconciliation Loop
Flux’s core concept is the reconciliation loop. Every controller follows the same pattern:
- Observe — check the desired state from the source (Git repo, Helm repo, OCI registry)
- Diff — compare desired state against the live cluster state
- Act — apply changes to converge the cluster toward the desired state
This runs on a configurable interval (default 10 minutes for GitRepository sources). You can also trigger reconciliation on-demand:
flux reconcile source git flux-systemOr set up webhook receivers so GitHub notifies Flux the moment you push — zero delay.
Deploy Your First Application
Create a directory structure in your config repo. Flux doesn’t enforce a layout, but this pattern scales well:
flux-demo-config/
├── clusters/
│   └── demo/
│       └── flux-system/        # Flux components (auto-generated)
├── apps/
│   └── nginx/
│       ├── namespace.yaml
│       ├── deployment.yaml
│       └── kustomization.yaml
Clone the repo and add the application manifests:
git clone git@github.com:$GITHUB_USER/flux-demo-config.git
cd flux-demo-config
mkdir -p apps/nginx

# Create namespace
cat > apps/nginx/namespace.yaml << 'EOF'
apiVersion: v1
kind: Namespace
metadata:
  name: nginx-demo
EOF

# Create deployment
cat > apps/nginx/deployment.yaml << 'EOF'
apiVersion: apps/v1
kind: Deployment
metadata:
  name: nginx
  namespace: nginx-demo
spec:
  replicas: 2
  selector:
    matchLabels:
      app: nginx
  template:
    metadata:
      labels:
        app: nginx
    spec:
      containers:
      - name: nginx
        image: nginx:1.25.5
        ports:
        - containerPort: 80
EOF
Now tell Flux to sync this directory. Create a Kustomization resource — this is Flux’s way of saying “apply everything in this path”:
cat > apps/nginx/kustomization.yaml << 'EOF'
apiVersion: kustomize.toolkit.fluxcd.io/v1
kind: Kustomization
metadata:
  name: nginx
  namespace: flux-system
spec:
  interval: 5m
  path: ./apps/nginx
  prune: true
  sourceRef:
    kind: GitRepository
    name: flux-system
  targetNamespace: nginx-demo
EOF
The prune: true flag is important — it means Flux removes resources from the cluster when you delete them from Git. Without it, deleted manifests leave orphaned objects.
Reference this Kustomization from your cluster bootstrap. Edit clusters/demo/flux-system/kustomization.yaml (or the auto-generated one) and add ./apps/nginx to the resources list, then commit and push:
git add -A && git commit -m "Add nginx application"
git push origin main
Within 5 minutes (or immediately if you reconcile), Flux picks up the changes:
flux get kustomizations --watchNAME READY MESSAGE REVISION
flux-system True Applied revision: main/abc123 main/abc123
nginx True Applied revision: main/abc123 main/abc123kubectl get pods -n nginx-demo
# NAME READY STATUS RESTARTS AGE
# nginx-5d4f7b8c9-abc12 1/1 Running 0 2m
# nginx-5d4f7b8c9-def34 1/1 Running 0 2mImage Automation: Let Flux Update Your Tags
Manually bumping image tags in YAML files defeats the purpose of automation. Flux’s image automation controllers handle this end-to-end.
First, bootstrap the image automation components (if you didn’t include them initially):
flux bootstrap github \
  --owner=$GITHUB_USER \
  --repository=flux-demo-config \
  --branch=main \
  --path=./clusters/demo \
  --components-extra=image-reflector-controller,image-automation-controller \
  --personal
Three resources work together:
- ImageRepository — scans a container registry for available tags
- ImagePolicy — selects which tag to use (semver, alphabetical, numeric ordering)
- ImageUpdateAutomation — writes the selected tag back to your Git repo
Create these in your nginx app directory:
cat > apps/nginx/image-repo.yaml << 'EOF'
apiVersion: image.toolkit.fluxcd.io/v1beta2
kind: ImageRepository
metadata:
  name: nginx
  namespace: flux-system
spec:
  image: nginx
  interval: 10m
EOF

cat > apps/nginx/image-policy.yaml << 'EOF'
apiVersion: image.toolkit.fluxcd.io/v1beta2
kind: ImagePolicy
metadata:
  name: nginx
  namespace: flux-system
spec:
  imageRepositoryRef:
    name: nginx
  policy:
    semver:
      range: ">=1.25.0 <2.0.0"
EOF
Now mark the deployment for automation. Add a marker comment to your deployment so Flux knows which policy to apply:
spec:
  containers:
  - name: nginx
    image: nginx:1.25.5  # {"$imagepolicy": "flux-system:nginx"}
Finally, the ImageUpdateAutomation tells Flux which Git repo to write updates to:
cat > apps/nginx/image-update.yaml << 'EOF'
apiVersion: image.toolkit.fluxcd.io/v1beta2
kind: ImageUpdateAutomation
metadata:
  name: nginx
  namespace: flux-system
spec:
  interval: 30m
  sourceRef:
    kind: GitRepository
    name: flux-system
  git:
    checkout:
      ref:
        branch: main
    commit:
      author:
        email: flux@example.com
        name: flux-bot
      messageTemplate: '{{range .Updated.Images}}{{println .}}{{end}}'
    push:
      branch: main
  update:
    path: ./apps/nginx
    strategy: Setters
EOF
Commit and push. When a new nginx tag matching the semver range appears on Docker Hub, Flux detects it, edits the deployment YAML, commits the change, and pushes it back to your repo. Then the regular reconciliation loop deploys the new image. The audit trail is in your Git history — you always know who changed what and when.
Helm Releases with Flux
Flux manages Helm charts natively through the HelmRelease resource. No separate Helm CLI needed — Flux handles repo indexing, chart downloads, and value overrides.
apiVersion: source.toolkit.fluxcd.io/v1
kind: HelmRepository
metadata:
  name: bitnami
  namespace: flux-system
spec:
  interval: 1h
  url: https://charts.bitnami.com/bitnami
---
apiVersion: helm.toolkit.fluxcd.io/v2
kind: HelmRelease
metadata:
  name: redis
  namespace: redis
spec:
  interval: 5m
  chart:
    spec:
      chart: redis
      version: "19.x"
      sourceRef:
        kind: HelmRepository
        name: bitnami
        namespace: flux-system
  values:
    auth:
      enabled: false
    architecture: standalone
Flux handles upgrades automatically — bump the version field or adjust values, push to Git, and Flux applies the Helm upgrade. Rollbacks are a git revert away.
Monitoring and Troubleshooting
flux get all is your first stop — it shows every Flux resource and its status:
flux get all -AFor deeper inspection:
# Check a specific Kustomization's status and events
flux describe kustomization nginx

# View reconciliation logs
flux logs --kind=Kustomization --name=nginx

# Force immediate reconciliation (skip the interval wait)
flux reconcile kustomization nginx

# Suspend reconciliation for maintenance
flux suspend kustomization nginx

# Resume
flux resume kustomization nginx
Common failure modes and their fixes:
- “unable to clone” — the deploy key is missing or has insufficient permissions. Re-run bootstrap or add the key manually.
- “Kustomization failing” — your YAML has a syntax error or references a resource that doesn’t exist yet. Check
flux describe kustomization <name>for the exact error. - “ImagePolicy not finding tags” — the semver range might not match any published tags. Run
flux get image allto see what Flux sees in the registry. - “HelmRelease stuck” — the chart version doesn’t exist in the repo, or values fail schema validation. Check
flux describe helmrelease <name>.
For notifications, Flux’s notification controller can send alerts to Slack, Discord, MS Teams, or any webhook endpoint when resources fail or succeed reconciliation.
Flux vs ArgoCD: When to Use Which
This isn’t a theoretical comparison — both tools work. The choice depends on your team’s operational preferences:
| Criteria | Flux CD | ArgoCD |
|---|---|---|
| Architecture | Controllers in-cluster | Standalone control plane |
| UI | CLI-first, no built-in UI | Rich web dashboard |
| Multi-tenancy | Namespace-scoped by default | Built-in RBAC, projects |
| Secrets | SOPS integration | External Secrets Operator or Sealed Secrets |
| Image updates | Native image automation | Argocd-image-updater (separate) |
| Learning curve | Steeper (YAML-heavy) | Gentler (UI-assisted) |
Pick Flux when you want a minimal setup, no external dependencies, and your team is comfortable with CLI-driven workflows. Pick ArgoCD when you need a web UI for non-Kubernetes-savvy stakeholders or want visual diffs during code reviews.
The two tools coexist fine — some organizations use both, with Flux handling cluster bootstrapping and ArgoCD managing application delivery.
Summary
Flux CD turns your Git repo into the control plane for your cluster. Once it’s set up, the workflow is simple: commit to Git, and Flux does the rest.
You’ve seen how to bootstrap Flux, deploy applications from Git, automate image tag updates, and manage Helm releases declaratively. The key habit to build is treating your config repo as the source of truth — no kubectl edit in production, no manual Helm upgrades. Every change goes through git commit, which means every change has an audit trail, a reviewer, and a rollback path.