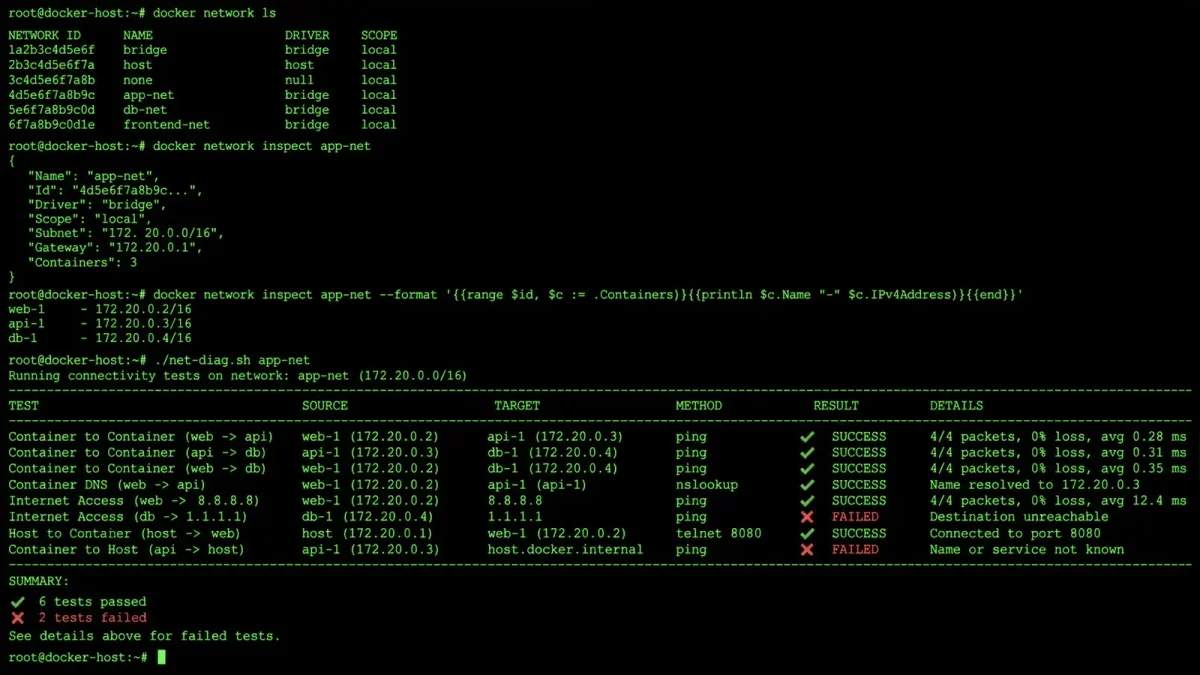
You spin up a Docker container, try to install a package or hit an API, and nothing works. The container can’t reach the internet. Before you start rebooting things or tearing down your Docker setup, stop. Most Docker networking problems fall into four categories, and you can diagnose which one you’re dealing with in under a minute.
The key insight is that network failures in Docker follow a predictable hierarchy. DNS issues are the most common and easiest to fix. IP forwarding problems are the second most common. Firewall and iptables conflicts are third. Actual routing issues are rare. Walk through them in order, and you’ll find the problem faster than randomly changing settings.
Step 1: Is It DNS or IP?
The first diagnostic question determines everything that follows. Open a shell inside your container and run two tests:
# Test IP reachability
docker exec your_container ping -c 3 8.8.8.8

# Test DNS resolution
docker exec your_container nslookup google.com
If the ping to 8.8.8.8 works but nslookup fails, you have a DNS problem. If both fail, the issue is lower in the stack — routing, firewall, or IP forwarding. This distinction saves you from chasing the wrong problem.
A working ping to 8.8.8.8 means your container can route traffic to the internet. The network stack is functional. The only thing broken is name resolution, which is almost always a misconfigured or missing DNS server inside the container.
If both tests fail, the container can’t reach the internet at all. This points to a deeper issue — the traffic isn’t getting out of the container, through the Docker bridge, and onto the host’s network. Skip ahead to the “IP Forwarding and Firewall” section.
There’s a third scenario worth noting: the ping works but curl or wget fails with a connection timeout. This usually means the container can reach some IP addresses but not others, which points to a routing table issue or a firewall blocking specific ports. In this case, check whether the target service uses a non-standard port that your firewall might be blocking.
Step 2: Check Which Network Your Container Uses
Docker networking behavior depends on whether your container is on a user-defined network or the default bridge. This matters because the two handle DNS differently.
docker inspect your_container --format '{{json .NetworkSettings.Networks}}'Look at the output. If the network name is bridge (the default), your container is on Docker’s default bridge network. If it’s anything else — a network you created with docker network create — it’s on a user-defined network.
User-defined networks use Docker’s embedded DNS resolver at 127.0.0.11. Containers on user-defined networks can resolve each other by name, and external DNS resolution goes through this resolver. The resolver forwards queries to the DNS servers configured in the host’s /etc/resolv.conf or the Docker daemon configuration.
Default bridge network copies the host’s /etc/resolv.conf into the container. If the host uses a loopback DNS resolver (like 127.0.0.53 on Ubuntu with systemd-resolved), the container can’t reach it because 127.0.0.53 inside the container refers to the container’s own loopback, not the host’s.
This is the single most common cause of Docker DNS failures. If your host uses a local DNS resolver and your container is on the default bridge, DNS will break. The fix is straightforward: either switch to a user-defined network or configure Docker to use external DNS servers.
You can also check which DNS servers the container is actually using:
docker exec your_container cat /etc/resolv.confFor user-defined networks, you should see nameserver 127.0.0.11. For the default bridge, you’ll see whatever the host’s /etc/resolv.conf contains. If you see nameserver 127.0.0.53 on the default bridge, that’s your problem.
Step 3: Fix DNS Issues
If you’ve confirmed the problem is DNS, there are three fixes depending on your setup.
Quick fix for a single container:
docker run --rm --dns 8.8.8.8 your_imageThis tells the container to use Google’s public DNS server. It works immediately but only for that one container. You can also use Cloudflare’s 1.1.1.1 or Quad9’s 9.9.9.9 — all are reliable public DNS services.
Global fix for all containers:
Edit /etc/docker/daemon.json and add a DNS configuration:
{
  "dns": ["8.8.8.8", "8.8.4.4"]
}
Restart Docker:
sudo systemctl restart dockerAll new containers will use these DNS servers. Existing containers need to be recreated because Docker injects DNS configuration at container creation time, not at runtime.
Fix for containers on the default bridge:
The cleanest solution is to stop using the default bridge. Create a user-defined network:
docker network create my_network
docker run --network my_network your_image
User-defined networks give you Docker’s embedded DNS resolver, which handles external DNS resolution correctly regardless of the host’s DNS configuration. This is why Docker documentation recommends always creating user-defined networks instead of relying on the default bridge.
If you’re using Docker Compose, this is handled automatically. Compose creates a user-defined network for your services by default. The problem only appears when you run containers with docker run without specifying a network.
Step 4: Fix IP Forwarding Issues
If both ping and nslookup fail, IP forwarding is the next suspect. Docker depends on the host’s IP forwarding to pass traffic from containers to external networks. Without it, traffic from the container reaches the Docker bridge but goes nowhere.
Check if IP forwarding is enabled:
cat /proc/sys/net/ipv4/ip_forwardIf the output is 0, forwarding is disabled. Enable it:
sudo sysctl -w net.ipv4.ip_forward=1Make it persistent across reboots by adding to /etc/sysctl.conf:
net.ipv4.ip_forward=1Then apply it:
sudo sysctl -pSome system hardening guides disable IP forwarding for security. If you’re on a hardened server, check whether your security policy allows it. Docker requires it, and there’s no workaround. If your security policy explicitly forbids IP forwarding, you’ll need to use Docker in rootless mode or find an alternative containerization approach.
You can also check whether Docker has set up its bridge interface correctly:
ip link show docker0
cat /sys/class/net/docker0/operstate
The bridge should be UP and in unknown state (which actually means it’s working — Linux reports bridge interfaces as unknown because they don’t have a single link state).
Step 5: Fix Firewall and iptables Conflicts
System updates, security tools, or manual firewall configuration can reset or override Docker’s iptables rules. When this happens, Docker’s NAT and port forwarding break, and containers lose internet access.
Check Docker’s iptables rules:
sudo iptables -t nat -L -n | grep DOCKERYou should see chains like DOCKER, DOCKER-INGRESS, and rules that handle NAT for container traffic. If these chains are missing or empty, Docker’s networking is broken.
The most common fix is to restart Docker, which re-creates its iptables rules:
sudo systemctl restart dockerIf you’re using ufw (Uncomplicated Firewall), you need to configure it to allow Docker traffic. The problem is that ufw doesn’t understand Docker’s network model — it sees traffic from containers as coming from the Docker bridge interface, not from the containers themselves.
Edit /etc/ufw/after.rules and add the Docker-ufw integration rules. These rules allow Docker to forward traffic while keeping ufw’s protection for the host:
# BEGIN UFW AND DOCKER
*filter
:ufw-user-forward - [0:0]
:DOCKER-USER - [0:0]
-A DOCKER-USER -j ufw-user-forward
-A DOCKER-USER -j RETURN -s 10.0.0.0/8
-A DOCKER-USER -j RETURN -s 172.16.0.0/12
-A DOCKER-USER -j RETURN -s 192.168.0.0/16
-A DOCKER-USER -j RETURN
# END UFW AND DOCKER
Then allow specific ports through ufw:
sudo ufw allow 80/tcp
sudo ufw allow 443/tcp
sudo ufw reload
If you’re using firewalld instead of ufw, add the Docker interface to the trusted zone:
sudo firewall-cmd --zone=trusted --add-interface=docker0 --permanent
sudo firewall-cmd --reload
The firewalld approach is simpler because firewalld understands network interfaces and can trust the Docker bridge without custom rules.
Step 6: Advanced Diagnostics
If the basic steps haven’t resolved the issue, you need deeper diagnostics. Use docker logs to check for networking errors at container startup:
docker logs your_container 2>&1 | grep -i -E "network|dns|connect|timeout"Check the Docker daemon logs for networking errors:
sudo journalctl -u docker --since "1 hour ago" | grep -i -E "network|iptables|bridge"Use tcpdump on the Docker bridge to see what’s happening at the packet level:
sudo tcpdump -i docker0 -n -c 20This shows you whether packets are leaving the container and reaching the bridge. If you see packets going in but no responses coming back, the problem is outbound — likely firewall or routing. If you don’t see packets at all, the problem is between the container and the bridge — likely the container’s network configuration.
For DNS-specific debugging, use dig instead of nslookup because it gives you more detail:
docker exec your_container dig google.com +traceThe +trace option shows you the full DNS resolution chain, so you can see exactly where it fails — at the local resolver, the upstream server, or somewhere in between.
Step 7: Verify and Document
After applying a fix, verify the container has full internet access:
# Full connectivity test
docker exec your_container sh -c "ping -c 3 8.8.8.8 && nslookup google.com && curl -s https://httpbin.org/ip"
If all three commands succeed — ping, DNS resolution, and HTTP request — your container has full internet access. The curl test is important because it verifies that TCP connections work, not just ICMP (ping) and UDP (DNS).
Document what you changed. Docker networking issues tend to recur after system updates, Docker upgrades, or firewall rule changes. Knowing that you added 8.8.8.8 to daemon.json or configured ufw to allow Docker traffic saves you from re-diagnosing the same problem six months later.
Keep a note in your deployment documentation. Something like “Docker requires IP forwarding enabled and DNS servers configured in daemon.json” prevents the next person on your team from hitting the same wall.
Common Gotchas
Before you start diagnosing, check these three things that trip up even experienced Docker users.
Docker Desktop vs. Docker Engine. If you’re running Docker Desktop on Mac or Windows, networking works differently than on Linux. Docker Desktop runs a Linux VM, and the networking stack goes through an extra layer of abstraction. DNS issues on Docker Desktop are often caused by the VM’s DNS configuration, not the container’s. Restarting Docker Desktop fixes more problems than restarting the Docker daemon.
Container restart policies. If you fix the host’s networking but the container still can’t connect, the container might have cached the old DNS configuration. Docker injects DNS settings at container creation time. A docker restart doesn’t re-inject them — you need to docker stop and docker run again, or use docker compose up --force-recreate.
Host DNS changes after container creation. If you change the host’s DNS servers after starting a container, the container won’t pick up the change. The DNS configuration is baked in at creation time. This catches people who update their host’s DNS during troubleshooting and wonder why the fix doesn’t work.
Multiple Docker networks. A container can be on multiple networks simultaneously. If you’re debugging networking issues, check all networks the container is connected to, not just the primary one. A container might have working DNS on one network and broken DNS on another.
Prevention
The best troubleshooting is preventing the problem in the first place. Here are three practices that eliminate most Docker networking issues:
Always use user-defined networks instead of the default bridge. This gives you Docker’s embedded DNS resolver and avoids the host DNS copying problem. Create a network once and reuse it:
docker network create app_network
docker run --network app_network your_image
Set DNS servers globally in /etc/docker/daemon.json so all containers have working DNS regardless of the host’s configuration. Google’s 8.8.8.8 and Cloudflare’s 1.1.1.1 are reliable choices. Configure this once and you’ll never debug Docker DNS again.
Keep a backup of your iptables rules and Docker networking configuration. When a system update breaks things, you can restore the known-good state instead of debugging from scratch:
sudo iptables-save > /root/iptables-backup.rulesDocker networking isn’t complicated once you understand the hierarchy: DNS first, IP forwarding second, firewall third, routing last. Walk through the steps in order, and you’ll fix the problem in minutes instead of hours.